How to Install a Ceiling Fan
One of the best ways to save on your heating and cooling costs is to install a ceiling fan that will circulate cool air in the summer and warm air in the winter. It’s a project that’s relatively easy. But it does require some basic knowledge of connecting electrical wiring, and maybe an extra pair of hands to help you lift it in place. Watch this video to learn the basics on how to install a ceiling fan.
**WARNING**
If you’re unsure about working with electricity, you should call a licensed electrician to do the work. But if you’re ready to give it a try, let’s go ahead and get started.
- Replacement Ceiling Fan
- Screwdriver
- Cordless Drill
- Wood 2 x 4
- Saw
- 3" Wood Screws
- Voltage Tester
- Ladder or Stepstool
- Pliers

Turn off the power that goes to the fan, and test that there is no electrical current using a voltage tester.

Remove the light shade and light fixture.

Remove the blades.

Remove the motor housing.

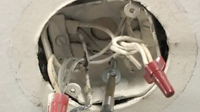
Remember the placement of the wires so you can replicate during installment. Take a photo or write down if needed.

If the ceiling fan electrical box isn’t securely fastened, cut a 2×4 to fit between the two rafters.

Go into the attic where the fan is and fasten the 2×4 between the house frames.
Return to the room and screw the electrical box to the 2×4 you just installed.
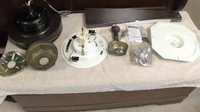
Lay out all the parts to your new ceiling fan and make sure no parts are missing.

Install the mounting plate.
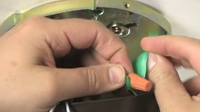
Wire the fan in the same way it was wired previously.

Paint the ceiling, if needed.

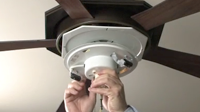
Install the canopy and assemble the blades.
Install the light fixture.

Attach the light shade, turn the power back on and test the new ceiling fan.
Read Video Transcript
One of the best ways to save on your heating and cooling costs is to install a ceiling fan that will circulate cool air in the summer and warm air in the winter. Installing a ceiling fan isn’t difficult. All it takes is some careful planning and maybe an extra pair of hands to help you lift it in place. In no time you’ll be enjoying the gentle breezes and comfort that only a ceiling fan can provide.
Today we’re going to replace a ceiling fan in the master bedroom. First, we’re going to take proper measures to make sure our new fan will be properly supported. Then we’re going to install our new fan according to the manufacturer’s instructions. As with any electrical project, if you’re unsure about working with electricity, you should call a licensed electrician to do the work. But if you’re ready to give it a try, let’s go ahead and get started.
The first step in this project is perhaps the most important one to remember if you’re replacing a ceiling fan as we are. Ceiling fans are relatively heavy compared to the average light fixture. Yet so often when installing a new ceiling fan people don’t take the proper precautions to make sure the fan is properly supported.
As with any electrical project, turn off the power at the electrical supply panel before starting. Then, check to make sure the power is off at the fixture with a voltage tester. Now we’ll carefully remove the existing fan. While each fan is different, most fans will come apart by first removing the lighting fixture, then the blades and finally the motor housing. Also be sure to note the existing configuration of the wiring so you can duplicate it with your new fan. Either sketch a diagram or take a photo of it with your cell phone.
A ceiling fan electrical box must be secured to the house’s framing members. Upon investigation, our existing ceiling fan was only supported by a flimsy brace which came loose over time, causing our fan to wobble. Always read the manufacturer’s instructions carefully for the proper way to prepare the fan site.
I think we’ve discovered why our old fan was wobbling. Instead of reusing this flimsy brace that was supporting the box, we’re going to secure the existing electrical box to a 2×4 as the instructions recommend. First we’ll measure between the two joists. Then cut the piece to length. We’ll fasten it to the ceiling joists with 3” screws toenailed in, which means drilled at an angle into the 2×4 through the joist. It helps if you start the screws before you climb up in the attic. Once the 2×4 is in place, finish drilling the screws into the joists.
Now, we’ll screw the box to our 2×4 from underneath, being careful to stay clear of our wires.
It’s probably a good time to lay out all of our parts to our ceiling fan.
One of the first choices we have to make is whether to use the standard mounting or the low-profile mounting method. There is also an angled mounting configuration for vaulted ceilings. Since this fan is over the bed, we’re going with the low profile mounting which positions the fan closer to the ceiling.
So let’s start installing our fan:
- First we’ll install the mounting plate to the electrical box.
- Then we’ll assemble the top housing.
- Now we can hang the fan from this hook on the mounting plate, which makes wiring the fan a lot easier.
- Now we’ll wire the fan, hooking the wires up in the same configuration as the old ceiling fan.
- Next we’ll install the canopy and assemble the blades.
Now is a good time to paint if you need to.
- Finally we’ll complete our installation with the light fixture.
- Turn on the electricity back on and check to make sure everything’s working.
This fan is equipped with a reversing function so we can have a downward air flow pattern in the summer and an upward air flow pattern in the winter. Look, the wobble is gone.
There you have it. Now you can rest assured knowing that your fan is properly secured, and that it will help you stay comfortable while reducing your energy costs. And it looks pretty good, too.
Close Transcript
Thanks for this post
Thanks for sharing
Thanks for the fan setup. i used it whn i installing them
Please keep us updated.
krunker
The option for users to design their own levels and share them with others is one of getting over it‘s primary features.
The ability to create and share custom levels is one of the game’s main selling points.
amanda the adventurer
Забронировать транспорт из аэропорта Македония (SKG) в центр города Салоники с помощью Aktis.Taxi просто и удобно. Для начала зайдите на официальный сайт https://aktis.taxi/Greece/Thessaloniki+Airport+Makedonia+SKG-%3EThessaloniki+City и пройдите простую процедуру бронирования. Вы сможете выбрать тип автомобиля, указать количество пассажиров и даже заказать дополнительные услуги, такие как трансфер или детские кресла.
Don’t compromise on connectivity at London Heathrow – choose portable wifi from portable wifi london heathrow for fast, reliable, and affordable internet access. Experience seamless travel with their solutions