How to Install a Light Switch
Are your light switches old and dingy? Replacing a regular light switch with a decorative one can add some design flair to any room in your home. Watch this video to learn how to replace a single-pole light switch, as well as the basics on how to work with electricity safely.
**WARNING**
If you’re unsure about working with electricity, you should call a licensed electrician to do the work. But if you’re ready to give it a try, let’s go ahead and get started.
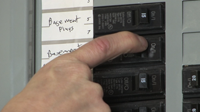
Find the breaker or fuse that shuts off the circuit that you will be working on. Make sure it’s in the off position.

Double check that the power is off by testing the light switch you’re replacing. Flip it on and off several times. If the light stays off, you’ve turned off the right circuit.

You can use a voltage tester near the light switch to check for an electric current.
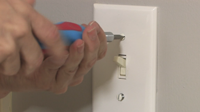
Take off the switch plate by removing the two screws that secure it to the light switch. Use an alternative light source if you can’t see what you’re doing.

Remove the screws holding the switch to the electrical box in the wall.
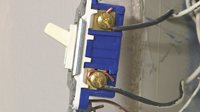
Pull the switch out of the box. Remember the way the existing switch is wired. Take a picture or write down if needed.

Remove the old wires.

Make sure the new switch is oriented properly before putting it in. The word “TOP” should tell you which end goes up.

Reconnect the wires. Wrap a little more than 1/2-inch of the stripped wire clockwise around the terminal screws and tighten with a screwdriver. Connect the black wire to the brass screw and the neutral wire to the silver screw. Connect the ground wire to the green screw on the opposite side of the switch.

Carefully push the switch back into the box and secure it with screws.
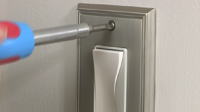
Screw the switch plate back on.

Turn the power back on and test the connection.
Read Video Transcript
There’s no better way to understand how an electrical circuit works than to replace a single pole light switch, whether it’s positioned along or at the end of the circuit.
Today, I’m going to show you how to replace a single pole light switch, while also giving you a lesson in electrical safety. For information on how to replace a three or four way switch, see our list of Frequently Asked Questions specific to this video.
Before starting any electrical project, you need to know how to access your electrical service panel to turn off the electrical supply to the circuit you are working on to avoid getting shocked. It’s also extremely important to carefully read and follow the manufacturer’s instructions. If you have any doubts about performing any of these tasks, you should call a licensed electrician to do the work. But if you’re up for it, let’s get started.
Your project actually begins at the electrical supply panel, which is also commonly referred to as a breaker box or fuse box. You first need to find the breaker or fuse that shuts off the circuit that you will be working on. This might take a few trips back and forth to the room to double check, and it’s always handy to have some help for this step.
Once you’ve found the correct breaker, flip it to the off position. If you have a fuse box, unscrew and remove the fuse controlling the circuit you are working on. When you return to the room you’re working in, double check that the power is off by testing the light switch you’re replacing. Flip in on and off several times. If the light stays off, you’ve turned off the right circuit.
One handy tool that I am never without on an electrical project is this handy voltage tester. By holding it near the light switch and pressing the button, a blinking light and beeper signals if there is any live electrical current present. If it signals there is still electrical current present after you’ve turned the breaker off, you may have to turn power to the entire house off and proceed with a battery powered light or call an electrician.
Now that we have confirmed that there is no power running to the switch, it’s time to illuminate the work area. Since you’ll be working without a light, you’ll need an alternate light source like this halogen work light. Depending on whether or not the outlets in the room are on the same circuit as the light, you may need an extension cord to plug the work light into a different room.
Next, remove the old light switch. Start by taking off the switch plate by removing the two screws that secure it to the light switch. Then remove the two screws that hold the switch to the electrical box in the wall. Pull the switch out of the box. Now is a good time to carefully examine the way the existing switch is wired. This is called the wiring setup, and you want to duplicate it with the new switch, exactly. You may want to take a picture of it in case you need to refer to it later or you can mark the wires with colored tape. Now remove the old wires.
To install the new switch you first need to make sure it is oriented correctly. Check to make sure the word TOP is on top of the switch. Then reconnect the wires exactly how you disconnected them.
This particular light switch has both terminal screw connectors on the side as well as push wire holes in back. While it’s OK to use either of these connection points, most electricians prefer to use the terminal screws because it’s a more secure connection.
To connect the wires to the terminal screws, wrap a little more than ½ inch of the stripped wire clockwise around the terminal screws and tighten with a screwdriver. It helps to have a pair of needle nose pliers for this step to bend a loop on the end of the wire before placing it around the terminal screw. Simply connect the black wire to the brass screw and the neutral wire to the silver screw. Then connect the ground wire to the green screw on the opposite side of the switch.
Now, carefully push the switch back into the box and secure it with screws. Then replace the switch plate and turn the power back on to test.
With just a simple flip of the switch you’ll be basking in the light of knowing that you did it yourself, with a little help from your local independent home improvement retailer.
If you have questions about this or any other home improvement project, be sure to read our list of Frequently Asked Questions for this video. And be sure to print out our Project Instructions, which includes a Tools and Materials checklist, before visiting your local independent home improvement retailer. That’s where you’ll find all the products and helpful advice to complete your project. If you’re not sure where to find your local store, check out our Store Locator.
Good luck with your project and thanks for watching.
Close Transcript
What if the electrical box does not have a ground wire (only two wires)?
Anyone with some experience with basic home repairs can install a light switch. The first step is to get rid of anything covering driving directions the existing hole in the wall, such as a plate or a cover. You can now see exactly where to start drilling your new hole.
i have a red wire a black wire a white wire and a ground wire what goes where
I am installing a led fluorescent light into an existing circuit. I am disconnecting one light and adding the fluorescent light fixture. the fluorescent light fixture lights up, but does not turn off with the switch that was hooked to the light that was disconnected. Why doesn’t the light turn off with the existing switch
Do need to the one that doesn’t a ground wire on but you buy one that do is there
I also have a black wire, white wire, a red wire and the ground wire.
You are all very well done. According to the rules and standards. Very high quality you have got it. You probably where that work in this direction?
I was replacing a ceiling light which has one power feed in and another out with a line to the switch. With all 3 black wires connected and no switch installed should one of the white wires have power?
What about where there is two switches for one light?
Thanks
Dave
I have two switches controlling different lights. I want to replace both switches but when I wired them thee way they had been, (I thought) the switches control multiple lights, outlets that they did not control before. One was only for a ceiling light the other was for an outdoor light.
Did not put a box in with light switch and light switch won’t go in the wall ! How will my husband fix it ?
I nhave house and the bathroom switch control the light in the bedroom next to it and a wall socket across the hall and I turn on the switch in bathroom u can turn on. Off the bedroom light but if the bathroom light isn’t on I can’t do nothing with light in bedroo
This is REPLACE not install new.
Learn the difference for next time.
I am replacing a dimmer light switch with a non dimmer. Completed fine except learned that this switch needs to separate it control power to lights in another room. As of now I have to turn on light in den (switch replaced) to get power in kitchen and they obviously need to work separately. Help.
Hi I have a new single switch light fitting to replace. I know the redwire goes to COMMON but where doe the earth and black wire go? My terminals are marked I WAY & 2 WAY.
I think you should combined the black wires and live the earth wire unfixed.
Hi, I want to connect a lighting switch that has three switch in one cover, and my terminals are marked ” COM, L2, COM, L2, COM & L2″ How to connect them, please help!
I need help please
There are many examples for such problem, I have read a lot about it because of my work, but still there is no concrete solution.
Installing a light switch is a simple process that can be done by anyone with basic DIY skills. First, you’ll want to remove any plates or covers that are covering the existing hole in the wall. This will give you a clear view of where to drill a new hole.
Hello, I need to replace a single switch light fitting. I understand that the red wire goes to COMMON, but where do the earth and black wires go? My terminals are labeled “I WAY” and “2 WAY.”
Thanks for the step by step guide, it was helpful. Unfortunately, I decided that it would be very difficult for me, and when I bought new light switches from the site https://evvr.io/products/in-wall-relay-switch-homekit-wifi, I called an electrician to make sure everything was safe set up
If you’re not sleeping well, it can affect your whole life. There is a growing list of myths about sleep and sleep deprivation that need to be debunked stumble guys. In this blog post, we’re going to cover 10 of the biggest myths about sleep.
The ways your How to Install a Light Switch shows are simple and easy. I also tried it with my friends on tunnel rush and it worked, you guys should try it too.
Thank you for posting this, helped me a lot.
Greetings from colorado.
Hello, I wanted to thank you for the practical advice you have provided. I was actually looking for a place where I can find job opportunities as an electrician and thanks to this service http://www.samedayresumeservice.com/ I finally got my job.