How to Replace a Light Fixture
Changing a light fixture is an easy way to add some design flair to a room. All it takes is the right tools and some basic knowledge of hooking up electrical wiring. Watch this video and we’ll shed some light on how you can install a new light fixture in your home.
**WARNING**
If you’re unsure about working with electricity, you should call a licensed electrician to do the work. But if you’re ready to give it a try, let’s go ahead and get started.
- New Light Fixture
- Work Light
- Phillips Tip Screwdriver
- Needle-Nose Pliers
- Step Ladder
- Voltage Tester
- Continuity Tester
- Utility Knife
- Combination Wire Stripper
- Wire Nuts
- Extension Cord
- Electrical Tape
- Light Bulbs
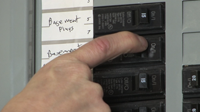
Find the breaker or fuse that shuts off the circuit that you will be working on. Make sure it’s in the off position.

Double check that the power is off by testing the light switch that goes with the light. Flip it on and off several times. If the light stays off, you’ve turned off the right circuit.
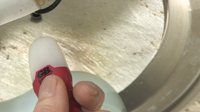
You can use a voltage tester near the light to check for an electric current.
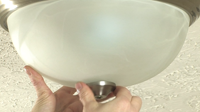
Remove the nut holding the light shade. Be sure to hold it so it doesn’t drop. Use an alternative light source if you can’t see what you’re doing.
Loosen the screws holding the fixture pan to the electrical box and remove the fixture pan.
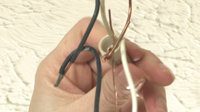
Remove any electrical tape that covers the wire connectors, then unscrew them from the wires. Use needle nose pliers if you need help separating them.

If your new light comes with a crossbar, screw it on to the outlet box.
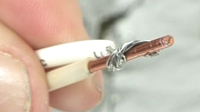
Reconnect the wires accordingly. Twist the wires together to ensure a connection.
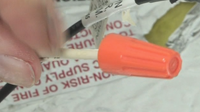
Cover the twisted wires with a wire nut, twisting clockwise until snug.
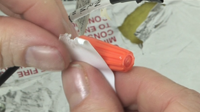
Wrap each connection with the appropriately colored electrical tape.

Insert the fixture pan, and finish installing according to the manufacturer’s instructions.
Turn the power back on and test the connection.
Read Video Transcript
Installing a new light fixture where an old one once was is a great way to add a touch of style and flair to any room in the house. And while it requires some electrical know-how, it’s not that difficult.
Today we’ll shed some light on how to work safely with electricity. We’ll show you some must-have electrical tools for your toolbox and teach you some basic wiring skills that will come in handy for other electrical projects around the house.
But before starting any electrical project, you need to know how to access your electrical service panel to turn off the electrical supply to the circuit you are working on to avoid getting shocked. It’s also extremely important to carefully read and follow the manufacturer’s instructions.
If you have any doubts about performing any of these tasks, you should call a licensed electrician to do the work. But if you’re up for it, let’s get started.
Your project actually begins at the electrical supply panel, which is also commonly referred to as a breaker box. You first need to find the breaker that shuts off the circuit to the room where you are working. This might take a few trips back and forth to the room to double check, and it’s always handy to have some help for this step.
Once you’ve found the correct breaker, flip it to the off position. When you return to the room you’re working in, double check that the power is off by testing the light switch that controls the light you’re replacing. Flip in on and off several times. If the light stays off, you’ve found your circuit.
One handy tool that I am never without on an electrical project is this handy voltage tester. By holding it near the light and pressing the button, a blinking light and beeper signals if there is any live electrical current present. If it signals there is still electrical current, you may have to turn power to the entire house off and proceed with a battery powered light or call an electrician.
Without any light in the room, you’ll need an alternate light source like this halogen work light. Depending on what circuit the light is on, you may need an extension cord to plug the work light into a different room.
Now that we have confirmed that there is no power running to the fixture, it’s time to remove the old light fixture. Most flush mount light fixtures like these come apart in similar fashion.
First, remove the nut that holds the light shade to the fixture pan. This nut might be attached to a finial. Be careful when you unscrew this nut and make sure to support the shade so it doesn’t fall to the floor when the nut comes loose. When loose, pull the shade off the threaded nipple and place it out of the way. Then loosen the screws that hold the fixture pan to the electrical box and remove the fixture pan.
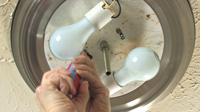
When the fixture pan is free from the junction box, go ahead and disconnect the wires. Remove any electrical tape that covers the wire connectors (or wire nuts as they are commonly called), then unscrew them from the wires. You may have to untwist the wires to separate them from each other using a pair of needle nose pliers. Then disconnect the ground wire. Take the old light down and place it out of the way.
Depending on your new light, if it is a similar style, it will probably install in somewhat the reverse order. But even lights that look similar have slight differences in construction and installation methods. So be sure to read and carefully follow the manufacturer’s instructions to the letter.
To install this light, we’ll first screw our crossbar to the outlet box. Next, we’ll thread the nipple with lock washer and hex nut through the crossbar and position it according to our instructions so it will hold the fixture pan in place flush with the ceiling. For this next part, you may need an extra pair of hands to help you hold the fixture while you re-connect the wires. Once we’ve tweaked the fit and tightened the hex nut to secure it to the crossbar, we’ll hook up our electrical wires, connecting the house black wire to the fixture’s black wire, then the house white wire to the fixture’s white wire and finally, the house ground wire to the fixture’s ground wire.
To make these connections, twist the ends of the wire together in a clockwise direction. After twisting the ends together, cover the twisted wire with a wire nut, twisting clockwise until it is snug. Now we need to wrap each connection with the appropriately colored electrical tape. You’ll do this for each of the three connections, including the black wire, the white wire and the ground wire. When all connections are taped, carefully stuff the connected wires into the outlet box.
With the wiring in place insert the fixture pan through the threaded nipple and finish the installation following the manufacturer’s instructions.
Turn the breaker back on and flip the light switch to the on position and watch your efforts illuminate the room.
Close Transcript
I have a Basement Storage Room that has an open ceiling with a surface mounted light fixture in middle of a 20′ x 15′ room, i could use another fixture in front of storage room.
my question is; Can i run a line for fixture using the existing elec. box that powers the existing fixture.
Very helpful.Thanks.
Wow what a great way to replace the light fixture. I used to call electrician for this but now I guess I don’t need him.
Hello
WONDERFUL Post.thanks for share..
Just wanna say that this is very useful, Thanks for taking your time to write this.
Do you want to take the business to the government sector and the private sector and take your business to the next level today: http://www.tenderbidding.com/
Awesome Blog I have read your blog completely. View latest Electrical Tenders
I think it is a good idea, I have thought of it but not as detailed as you
Now that I have the information, I hope to have more information
the information shared is very helpful, I have a similar problem and am looking into it
This is a great thing, I think everyone feels this information is very valuable, thank you
Find the breaker or fuse that shuts off the circuit that you will be working on. Make sure it’s in the off position.
The information provided is quite helpful; I am investigating a similar issue.
it’s a good idea. I really like this way of protecting the environment
The royal blue dining room with its terrible moto x3m, outdated chandelier was the only source of anxiety.
Very nice and informative post, thanks for your article. you can also stop by gartic phone to play the best games during recess
I am a electrical engineer but i have never thought about these types of ideas. Although Other people also give ideas, but no one has such a customized idea. great post should be promoted.
This is an awesome, fantastic material. I was happy to see your article, by the way. Wikipedia Experts for hire greatly value your assistance and am looking forward to speaking with you about
You’ll be able to see where your edition fits within the title’s overall publication history. This will help you understand how old it truly is spacebar clicker
mario games is a wonderful game that I’ve spent far too much time playing x trench run
You can win races if you timing your gear-change precisely. However, incorrect gear-change timings may lose a handful of microseconds that might have been spent accelerating! The harder Amateur Mode yields 33% more gold.