Belt Sander, Orbital Sander or Palm Sander – How to Choose Your Power Tool
There will come a time when the project calls for sanding a surface to make it smooth. While there are plenty of hand sanding products you can use to get the job done, there’s nothing like a portable power sander to get it done fast and ensure a smooth finish. We’re going to look at the most common types of portable power sanders that will tackle most DIY applications. We’ll also discuss choosing the right sandpaper.

Always wear a dust mask whenever you’re sanding for a project. Make sure the dust mask is certified for catching sanding dust. This information can be found on the packaging.

Random orbit sanders are the choice of woodworkers because they use a round disc of sandpaper to sand in both an orbital as well as rotary motion. By combining these two sanding motions at the same time, it reduces swirl marks that can ruin a fine finish.
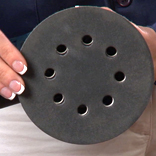
Sand paper attaches to a random orbit sander using a sticky backing or a velcro backing. The holes allow the sander to remove dust from the sanding surface.

Palm sanders, also known as finish sanders, move the pad in small, circular orbits.

Sandpaper attaches to a square pad on the bottom of the palm sander with these clamps. It’s extremely easy to handle and can use standard 9”x 11” sheet sandpaper cut to size.

Detail sanders are ideal for getting into some of the tight spots where other sanders won’t fit.

Detail sanders are extremely easy to use and can accept a variety of attachments for particular applications.

Belt sanders can be used for removing material fast and aggressively. It sands using a continuous belt that rides between either two or three pulleys. Most belt sanders have an adjustment feature that automatically maintains the belt in the center of the pulley during operation.

Along with this 21” model, belt sanders also come in 18” models, which are more suited to do-it-yourself activity. The most common models of each size accommodate 3” wide belts.
Read Video Transcript
Whether you’re working on a do-it-yourself construction project or refinishing an antique, there will come a time when the project calls for sanding a surface to make it smooth. While there are plenty of hand sanding products you can use to get the job done, there’s nothing like a portable power sander to get it done fast and ensure a smooth finish.
Today we’re going to look at the most common types of portable power sanders that will tackle most DIY applications. We’ll also discuss choosing the right sandpaper. So let’s get started.
The first sander we’ll be using today is this palm-style random orbit sander. Random orbit sanders are the choice of woodworkers because they use a round disc of sandpaper to sand in both an orbital as well as rotary motion. By combining these two sanding motions at the same time, it reduces swirl marks that can ruin a fine finish. While they are available in both palm- and pistol-grip styles, one important feature is having a variable speed setting that allows for slower, delicate work or faster, more aggressive work. Most models also have dust filter canister or filter bag to collect sanding dust. And many models have adaptors that can be hooked up to a shop vacuum or other dust collection system in your workshop. This helps increase sanding efficiency and also greatly reduces the amount of dust created by the tool. Another way this tool helps reduce dust is by using these hook and loop disks with holes that align with holes on the tool’s sanding pad. When sanding, dust is channeled through these holes and is deposited in the filter canister or is sucked into the shop vac.
Now a word of caution here … even though many manufacturers include dust collection with their sanders, you should always wear a dust mask like this one, to prevent inhaling sanding dust. Always check the packaging to make sure the mask is rated for sanding dust. In addition, always check the surface you are sanding to make sure it doesn’t contain lead paint. For more information on testing for lead paint, see our video “How to Paint a House – Exterior Paint Preparation.”
The next type of sander we’ll be using today is this palm sander, which is also called a finish sander. Sandpaper attaches to a square pad on the bottom of the sander with these clamps. Then the motor moves the pad in small, circular orbits. It’s extremely easy to handle and can use standard 9”x 11” sheet sandpaper cut to size, making it a more affordable option than other sanders when factoring in the cost of sandpaper.
To help with dust collection, most models have a sandpaper piercing plate that allows you to transform a standard sheet of sandpaper into one with holes designed to fit on the bottom of the sander. As you can see, this sander is great for sanding in corners and for finish work.
The next sander you’ll need in your sanding arsenal is a detail sander like this one, which is ideal for getting into some of the tight spots where other sanders won’t fit. It’s extremely easy to use and can accept a variety of attachments for particular applications. See how it easily reaches into tight corners. You couldn’t reach in there with any of the other sanders we looked at today.
The last type of sander we’re going to demo is this monster, otherwise known as a 21” belt sander. Belt sanders are ideal for removing material fast and aggressively, so if that’s what you need to do, this is the sander for you. It sands using a continuous belt that rides between either two or three pulleys, as in the case of this model. A drive pulley drives the belt and the idler pulleys guide it. Most models have an adjustment feature that automatically maintains the belt in the center of the pulley during operation to eliminate belts that wander off the pulleys.
Along with this 21” model, belt sanders also come in 18” models, which are more suited to do-it-yourself activity. And the most common models of each size accommodate 3” wide belts. Many models also have dust collection systems built into the tool to help control the dust produced from sanding.
So let’s take this puppy for a test drive. When operating a belt sander like this one, always have two hands on the grips. This will give you more control of the tool to help prevent gouging or rippling a soft wood surface. Remember, this sander can remove material rapidly and aggressively, which is sometimes just what you need.
So now that you have a grasp on the different types of portable power sanders and what each is designed to do, it’s time to talk about sandpaper, which is where the rubber meets the road when it comes to sanding.
Most manufacturers make sanding pads and disks that fit different types of sanders. How they attach to the sander is the main difference. One style uses a pressure-sensitive adhesive, which has a sticky backing. Generally, this type is used for sanding jobs where you will use the sandpaper until it is worn out. Another style is hook and loop, which attaches to the sander like Velcro. While it’s a little more expensive, it can be removed and later reapplied, which is ideal for jobs that require frequent changing of the sandpaper–for instance when sanding a tabletop where you are going from coarse grit to progressively finer grits. A more economical alternative includes sanders that use clamps to hold the sandpaper to the sanding pad. For this type of sander, standard sheet sandpaper can be used after it is cut to size. For more information on the different types of sandpaper and coarseness grades, see our frequently asked questions for this video.
So there you have it. Now you have the confidence to take on any do-it-yourself project that requires sanding. And everything will go smoothly because you know how to choose the right sanding equipment for the application. In the end, your reward will be flawless finish that you’ll admire for years to come.
Close Transcript
Watch Here All Tamil Tv Programs And Tv Show Latest Updated Video Free Downloads With Without Any Ads.
Tamildhool
Great and helpful guide. I use a primer with mineral foundation and concealer and have never felt the need to contour
this is very infromativ and entertainable website page i love i
Thank you for the fantastic post, admin. This is awesome information.