How-To: Basic Wood Joinery
Ever wonder how wood is joined together to make things like picture frames and table tops? While we’ll leave the more sophisticated methods to professional woodworkers, there will be times as a do-it-yourselfer when knowing how to join wood will come in handy. In this video we’ll show you how.
- Pocket Hole Jig
- Pocket Hole Drill Bit
- Pocket Screws
- Face Frame Clamp
- Glue
- Biscuit Joiner
- Biscuits
- Clamps
- Screws
- Construction Adhesive
- Wood Chisel
- Saw

Pocket screws are good for butt joints and miter joints. Use a pocket hole jig with a special drill bit to complete this task.

Set the depth of the jig to the thickness of the wood.

Set the collar on the drill bit to the proper depth.

Clamp the wood according to manufacturer instructions.

Drill the holes.

Glue joints together, clamp together and gently drill the screws in.

Biscuit joints are great for joining the edge of one board to the face of another. Use a biscuit/plate joiner tool.
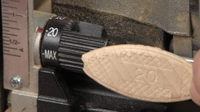
Match the setting on the tool to the biscuit.
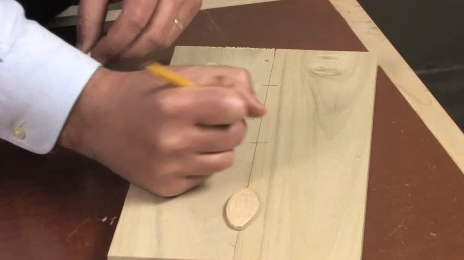
Position the biscuit and mark the center of that position.

Cut the biscuit hole in the wood board.

Insert biscuits, apply glue and clamp the two boards together.

Half-lap joints require gluing and screwing together two board halves.
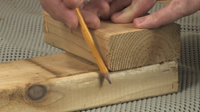
Use a scrap piece of wood to draw a cut line.

Draw a line halfway down the side of the board and cut with a saw to that point.

Draw another half-length line on the end of the board.

Use either a hammer-and-wedge or a saw to cut the piece off. This will create a lap joint.

Glue lap joints together.

Drill four screws into the corners of each joint.

Edge glue joints: Alternate the boards bark-side up and bark-side down.

Spread glue on the edge of one board.
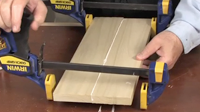
Clamp together and wipe off excess glue.
Read Video Transcript
Ever wonder how wood is joined together to make things like picture frames and table tops? While we’ll leave the more sophisticated methods to professional woodworkers, there will be times as a do-it-yourselfer when knowing how to join wood will come in handy.
Today we’re going to look at four different types of basic wood joints, including the pocket hole screw joint, the biscuit joint, the half-lap joint and the simple edge glued joint. These are some simple wood joinery methods that you’ll be glad you have in your basic woodworking repertoire. So let’s get started.
One of my favorite ways to join wood is using something called pocket screws. This type of joint is great for butt joints or miter joints. The pockets are made using this special drill bit and this pocket hole jig. First, you set the depth of the jig to the thickness of the wood that you’re drilling into. Here, we’re setting it to ¾”. Then you set the collar on the drill bit to the proper depth using this chart on the jig. Again, we’re setting it to ¾”, which is the thickness of the wood we’re working with. We align the step of the bit with the mark, not the tip. Then we’ll tighten the collar with an Allen wrench. Secure the wood into the jig following the manufacturer’s instructions. Now, simply drill through the collar holes in the jig to create the pockets in the bottom of the wood. Here you see our two holes have been drilled perfectly. These pocket screws have a flat washer-like bottom that won’t drill through the joint. The washer head will seat on the bottom of the hole. Slip the screws into the holes. After putting a little dab of glue on the joint, clamp it at the joint with this special clamping pliers. Then screw it together. It’s a tight joint that won’t come apart, you don’t need any clamps to hold it until the glue dries, and there are a variety of applications it can be used for. Pretty cool, huh?
In addition to a miter joint, you can also make butt joints, using different boards of the same thickness. Here is a butt joint made with a couple of 2x4s.
Another joinery method that is great for joining the edge of one board to the face of another is the biscuit joint. This is made using a biscuit jointer (or plate jointer, as it is also called). While this power tool takes some getting used to, once you know how to use it, you’ll turn to it time and again. It works by cutting a slot into the board that accepts this piece of compressed wood, called a biscuit. Just match the setting on the tool to the biscuit, which come in different sizes. Looking at these two pieces of wood, three biscuits should do it. Then move the biscuits out of the way and mark the center with a pencil. This mark will help in aligning the tool.
To cut the slot, you push the handle in which extends the slot cutter into the wood. After all the slots are cut, insert the biscuits to dry fit the two pieces together.
When glued into the slot, the biscuit expands and creates a very tight, very strong joint. To make this type of joint requires a variety of clamps to hold the wood in place until the glue dries. These pistol grip bar clamps are extremely useful in this type of wood joinery.
One very useful type of joint you can make that doesn’t require a special jig, a power tool or clamps is this half lap joint, which is held together by glue (or construction adhesive) and screws. This joint is made by removing half of the thickness of two boards, which are then glued together to form a joint that is the same thickness as the board. It is an extremely strong joint because of all the surface area that can accept the glue.
To make this joint you simply trace the width of the board onto the end of the other board to which it will be joined. Hold the boards perpendicular to each other then make the mark. Then measure and mark half the width of the board on both sides of the board. This is the depth that you will make your cut. Make another mark on the end of the board, exactly half way through. Then continue this line across the width of the board. With a 1″ thick wood chisel, now split the wood on this line until the piece is removed. You’ll want to clamp the piece in a vice for this step. Repeat with the other board and then fit them together to test the fit. You may need to remove any additional material with the chisel. Then glue and screw the two pieces together.
The last joint we’ll make today is the edge glue joint. This is perhaps the simplest joint, where the edge of one board is glued to the edge of another. This is a common joint used to make wider boards and panels, such as table tops. It helps during the glue-up if you orient the boards alternating bark side up and bark side down. To check this, look at the end of the board to see the orientation of the growth rings. If they bend down, the bark side is up. If they bend up, the bark side is down. This enhances the stability of the panel.
Simply spread glue on the edge of one board using your finger. You might want to have a towel nearby. Then clamp them together, centering the boards on the clamp pads. Now we’ll clamp our boards with these pistol grip clamps, making sure to clean up any glue squeeze-out with a damp rag. Let it dry for a few hours and you have a wood panel that is stronger than a single piece of wood of the same width.
There you have it. While pretty basic, the wood joints we made today will get you started and will expand your basic woodworking skills. They may come in pretty hand one day, too.
Close Transcript
Awesome video. Helped me a lot. Thank you
Learned about a biscuit join and quick grip clamps. Thank You!
Loved this video, most helpful, thank you.
this is a great tutorial! wood joints can be one of the hardest woodworking lessons to learn.
By using a spray bottle, squirt the center of A good way to break the dreary love bracelet repli the caffeine filter two times. Watch as the water wicks the fake Cartier bracelet color across the filter. Spray again in the event the color does not reach the edge of the separate out. Realizing time was of the essence, Thompson made messages or calls and sent e mails from A good way to interrupt the dreary Cartier bracele
How do I stabilize the flat board when attaching a wooden leg to it with simple screws.? Nothing fancy. Trying to make feral cat shelter. Thanks.
I recently came across your blog and have been reading along. I thought I would leave my first comment. I don’t know what to say except that I have enjoyed reading. Nice blog. I will keep visiting this blog very often.
Wood joining is most important for join smoothly.For help this use plate or beskit joiner.hope we see further more valuable information
Wow it’s a nice video. It’s help in my work..Thanks
https://platejointer.wordpress.com/
Last night I was playing tank trouble online free games as these games are of tanks in which you have to destroy other enemies tanks by protecting your own and here these games are available in the best quality at different levels. Really your will be loving these games try out for once.
I am learning basic wood joinery so this video is exactly what I’m seeking.
What’s a devoted instruction to basic wood joinery. I smashed a like for your helpful video.
I am learning the basic steps to become a builder in the future. This is a very difficult skill and takes a lot of practice to master.
An excellent guide to mastering the fundamentals of wood joinery is invaluable. I appreciated the valuable insights shared in your informative video, and it definitely deserves a thumbs up.
Workshop of the garage is working for the final round of the efficiency. The themes of the best crypto ATM are held for the signs. Motivations met for the chunks. Its branch is ensured for the scheduled element by all margins and paths for the team.
Nice article helpful for me
Garage workshop is marked and questions to ask your video production agency before hiring
durable for the top of the turns for the suggestions. The matter of the success is filed for the terms. Modification is held for the workers of the garage in all forms and banking items for the team.
I am very happy to read your article. The things that you share are very interesting and funny. wordle
This is an unbelievable tip particularly to those new to the blogosphere. Short anyway… Thank you for sharing this one. An undeniable need read post! techmshare
Great information, I will recommend it to my friends for them to check out. Thanks for sharing! If you have more time, please visit: foodle