Weatherproofing Your Home – Attics
In this final segment of our 3-part home weatherization series, we’ll be up in the attic preparing to add a layer of insulation. But before we start, we’ll be taking measures to make sure our insulation can achieve its maximum R-value potential. To do this we’ll be sealing the cracks and gaps between our home’s conditioned living space and this vast frontier of temperature extremes that’s notorious for wasting energy.
Here are other ways that you can insulate your home:
- Insulating Spray Foam Sealant
- Rubber Gloves
- Safety Glasses
- Fire Block Seal Foam
- Fire Resistant Sealing Caulk
- Level
- Tape Measure
- Box Cutter
- Construction Adhesive
- Aluminum Foil Tape
- Rigid Foam Insulation
- Weather Strip Tape
- Soffit Vent Baffles
- Staples
- Staple Gun
- Fiberglass Insulation
- Face Mask
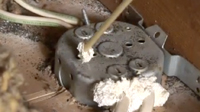
Locate light boxes and seal them with insulating spray foam sealant.

Fill holes in the top plate, where electrical wiring runs through with fire resistant sealing foam.

seal around the plumbing vent stack.

For recessed lighting, create an insulation cover for the fixture. Leave a 3-inch safety gap between the edges of the box and the light fixture.

Seal the box you just created to the drywall below.
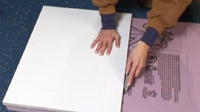
To insulate the attic hatch, use the hatch to measure and cut some rigid foam insulation.

Glue the rigid foam insulation to the back of the attic hatch with construction adhesive.

Add weather strip tape around the hatch frame before placing the attic hatch back in place.
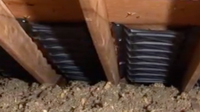
Add Staple soffit vent baffles to the bottom of the roof decking before you apply fiberglass insulation.

Lay out fiberglass insulation in long strips across the entire floor of the attic. Be sure to wear long padded clothing, gloves, a face mask, and safety glasses before handling fiberglass.
Read Video Transcript
In the first two episodes of our Home Weatherization series, we addressed ways you can improve your home’s energy efficiency and comfort level by sealing air leaks around windows, doors and in your basement. In this episode, we’ll focus on a space that many homeowners often neglect in their efforts to make their homes more energy efficient. It’s your attic, and it’s where you can probably make the biggest impact of all.
Today we’ll be up in the attic preparing to add a layer of insulation. But before we start, we’ll be taking measures to make sure our insulation can achieve its maximum R-value potential. To do this we’ll be sealing the cracks and gaps between our home’s conditioned living space and this vast frontier of temperature extremes that’s notorious for wasting energy. So let’s get started. And we’ll start with the easiest places to find first.
The electrical boxes that anchor lights and ceiling fans to the ceiling below are some of the leakiest places in your attic. The good news is they are usually the easiest to find. Just look for the wiring. It will almost always lead you to an electrical box. When you find one, the best way to seal it is with insulating spray foam sealant. Just spray it where the wires penetrate the box, and around the seams of the box. That should do it. And remember, whenever you’re working with insulating spray foam sealant, be sure to wear gloves and eye protection. Also be sure to check your local building codes to find out whether you need to use a special type of fire blocking caulk or sealant rated for its fire and draft stopping capabilities. See our frequently asked questions for more information.
The next place these electrical wires will lead us is through the framing down into the walls below. This is called the top plate, and it’s another area known for leaking. A couple shots of this fire block spray foam will seal it up tight. Where the top plate butts up to this drywall is another major leak-prone area. Just run a bead of spray foam sealant down the seam where drywall meets framing.
We’ll switch over to our caulk gun and use this fire blocking caulk to seal around the plumbing vent stack, which is another leaky culprit. Next we’ll see about these recessed lights. If you can see light coming into a dark attic, conditioned air also coming through. If this light was rated for insulation contact (which is typically referred to as IC-rated) we could place our insulation in direct contact with the fixture’s housing. Unfortunately, it’s not IC-rated. Instead of replacing it however, we’ll make a cover out of rigid foam insulation to seal it. We just need to leave a 3″ safety gap around the fixture.
We’ll start by measuring the dimensions of the fixture, measuring length, width and height. Then we’ll cut our pieces, making sure to account for the 3″ safety gap on each side. Finally, we’ll assemble the box using construction adhesive and aluminum foil tape. When putting it in place, be sure to cut notches for any joists or wire penetrations. That’s a pretty good fit. Now all you have to do is seal the box to the drywall below using expanding spray foam sealant.
Since we’re on the subject of rigid foam insulation, we’ll go ahead and seal and insulate our attic hatch, which is another one of the most leak-prone areas between the attic and your home’s conditioned space. Using the hatch, we’ll trace the measurement on a piece of 2″ thick rigid foam insulation, first scoring it with our blade knife, then snapping it across our knee. Then, using construction adhesive, we’ll glue it to the back of the hatch. To seal the hatch, we’ll add some weather stripping around the rim. Yes, it’s really that easy. What’s even easier is this insulated cover for our attic stair access bulkhead. Just spread it out and place it over the opening as you climb down.
OK, now is it time to add our layer of fiberglass insulation you ask? Not quite yet. First, we’ll need to install these soffit vent baffles to make sure we don’t block our soffit vents with insulation. Blocked soffit vents can restrict air circulation in an attic can lead to all sorts of moisture problems, including mold. Simply staple the baffles to the bottom of the roof decking between the roof rafters. As you can see, this will provide the necessary ventilation even after we add our insulation.
Now it’s time to run our insulation. Today we’re going to install these un-faced fiberglass batts over our current insulation. We’re using un-faced batts to avoid any moisture problems that might occur between our existing layer of loose fill insulation and the additional layer we’re adding. We also want to make sure we don’t compress the insulation below, with will reduce its R-value. If our attic didn’t have any insulation, we would use this kraft paper faced insulation, laying the paper side down between the joist bays to act as a moisture retardant. For more information on adding insulation, see our frequently asked questions for this video. Well run them perpendicular to our ceiling joists to ensure good coverage. Now we’ll just roll out the batts, making sure there aren’t any gaps between rows. To cut it to a length, simply compress it and cut it with a blade knife. It’s that easy.
So there you have it. Now you know the importance of performing the necessary prep work before you just start adding more insulation to your attic. But most importantly, you know where to focus your efforts in order to achieve the greatest return on your time and investment in making your home more energy efficient.
Close Transcript
So important to remember to do these things. Thanks for the reminder 😉 Will pass along!
I enjoyed the three videos. Thank you
thank you will look into thsese videos again, just bought a house and now it needs weatherproofing everywere, door frames etc, window seals. my ac constantly turns on. will look into other videos too as I am new to this repairs.
Here is a chance for the solve all the technical issue of the file explore and you can operate all the recent files and folders open file explorer windows 10. It would be good experience for you which you never feel ever.
There’s a lot of technical problems at home nowadays some leakage in the pipe and wall because of pipe broken and because of that people get in trouble. So, the best solution to save your wall for water leaking is best Pipe Guard that is available online to our store that prevents water leakages and our pipe life is a lifetime.
Spray foam insulation is an alternative to traditional building insulation, and it can be used to insulate roofs, lofts, walls and floors.
It is a liquid foam that is sprayed into position within the insulating layer. The foam works as an effective insulator and can also stop water leakage.
http://foametixinsulation.com/
Its a nice article regarding a roof .
Nice article weatherproofing your home.
Roof water Proofing
Roof waterproofing
Enjoy the lowest prices and best selection of Acoustic Guitars Acoustic guitar for a beginner
The article provide us information regarding weather proofing for your home attics.Before hitting on the other blogs I would request all to give a try here to get the best available content here. The article is much informative regarding work as well. It can be really great for people like me who are looking for grabbing more knowledge about it. I have seen similar information at one place, you can also see on pilkingtoninsulation.co.nz.
There are a lot of technical issues at home these days, including leaks in the pipe and the wall caused by a damaged pipe. Thank you for sharing this helpful and engaging content with us! I can’t wait for your next post!
<a href="https://www.dryshield.ca/blog/understanding-the-impact-of-poor-waterproofing-real-life-disasters-and-lessons/">Preserve the environment and safeguard your home with effective basement waterproofing solutions. It’s a win-win for you and the planet.