How to Build a Birdhouse
Teaching children about wildlife is easier than you think. And it’s as easy as learning about the birds in your own backyard. In this video you’ll learn how to build a birdhouse with your kids that they will cherish for years. You’ll also learn some cool wood joinery basics that will help build your woodworking skills.
- Cedar Board
- Saw
- Pitch Gauge or Angle Gauge
- Speed Square
- Biscuit Joiner
- Biscuits
- Glue
- Clamps
- Hinge
- Spade Bit
- Hole Saw
- Wooden Peg
- Forstner Bit
- Drill

Use a rot-resistant wood, like cedar.
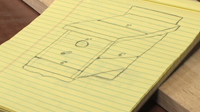
Draw out the project, recording the width, height, and depth of each side.
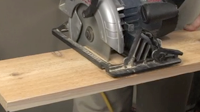
Cut the boards to size.

Position the boards together to check that everything came out right.
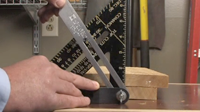
To create a slant in the roof, set the angle tool to 65 degrees.
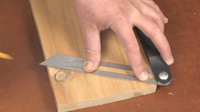
Draw the angled line on the board.

Cut the angles. Repeat steps 5-7 with the second side of the roof.

Position all boards together and draw a 65-degree line on the boards at the top.

Cut the angles so the top is flush with the roof piece.

Mark and cut excess board at the bottom.

Leave a 2-inch lip at the bottom and top of the back piece. This part will be nailed to the tree.

Join the boards together using biscuit joints. See our video on How-To: Basic Wood Jointery.

Glue and clamp everything together. Let the glue dry.

Screw the bottom on and drill some holes in the center for drainage.

Attach a piano bench joint to the roof. This will allow you to open up the roof to occasionally clean out the birdhouse.

Cut and glue a support block on the front. Drill the access hole.

Drill a smaller hole below the access hole to insert the perch. Check out the video How to Drill Holes.

Paint the completed birdhouse and nail to the tree.
Read Video Transcript
There is no better way to learn about nature with your kids than teaching them about the wildlife living in your own back yard. Even if you don’t have an abundance of furry creatures roaming about, you probably at least have some fine feathered friends that you can feed and encourage to stay by building them a home.
Today we’re going to build a birdhouse that you can hang in your backyard. In the process we’ll learn about some basic woodworking skills. We’ll also put up some feeders and a birdbath to make them feel even more at home. So let’s get started.
We’re going to make our birdhouse out of cedar boards. As you can see, this board is rough on one side and smooth on the other. We’re going to construct the house smooth side out. We drew an initial sketch of the dimension of the house and determined that we can get all of the sides, the bottom and top out of one 10″ wide, 8 foot long cedar board. Let’s start with the top of the house. Since it will overhang the sides, we’ll cut this piece off before ripping the board to width. First we’ll measure, then make our cut line with our speed square before cutting it with our circular saw.
Now, using the table saw, we’ll rip the board to width, orienting our cut to remove any knots along the side of the board. Raise the sawblade to where it’s just a 1/8 of an inch or so above the thickness of the board. This will help prevent kickback. Then, we’ll double check our fence setting by measuring from the blade to the fence. Now we’re ready to rip the board. We’ll use this push stick to keep our hands away from the blade.
Next we’ll cut our sides to length, first measuring them and marking them using our speed square. We’ll cut them with our circular saw.
Let’s take a minute to position the sides and top to see how it will all come together. Our top will sit at an angle, like this, to shed water. We’ve determined that an angle of 65 degrees will work best. To find that angle on our angle finder, we’ll use a speed square and the method you see here. We’ll mark the angle on our board and cut it with our circular saw. We’ll use this piece to trace the same angle on another board, and cut that one as well. Now our two side pieces are the same. Remember, these sides will face one another, so you’ll have to draw your angle mark on the rough side of the second board. We’ve maintained our angle perfectly.
Now let’s lay out all the pieces to see how it is coming together. This will also help us determine the next series of cuts that we’ll have to make.
Both the back edge of the top and the top edge of the front will need to be cut at a the same 65 degree angle so our top will lay flat. First mark the orientation of this angle on the boards. Then use the angle gauge to make it precise. To make this cut we’ll tilt the blade of table saw to 25 degrees (the inside angle measurement) and double check it with our angle gauge. That’s what we’re looking for. Now we’re ready to run the pieces through using our miter gauge. We’ll lay each piece in place as it is cut.
Before cutting our front to length, we’ll insert the bottom and mark the front in place. We’ll also want to leave a 2-inch lip on the bottom for screwing it to the tree. Now let’s mark the bottom and cut it to length.
Now that all of our pieces have been cut to length, we’ll start laying out the marks for our biscuits. We’re going to be using our biscuit jointer and these biscuits to join the edges and faces of our boards. For more on making this time of wood joint, see our video “Basic Wood Joinery Techniques.”
We cut the slots on both boards one corner at a time. After working our way around to all four corners, we’ll dry fit all the sides together to see how they fit before gluing it with this exterior wood glue, which is waterproof. We’ll take our time on the glue-up stage, being careful that each mating side is properly covered and that the biscuits have plenty of glue coverage.
The last side to go on is the front. We’ll tap everything in place with a hammer and clamp it up using these pistol grip clamps. The more clamps the better. Clean up any glue squeeze-out with a damp rag.
We’ll leave the clamps on for a half hour or so, which is what the glue manufacturer suggests. In the meantime, we can screw the bottom on. We’ll drill some pilot holes and use these stainless steel deck screws. We’ll also drill a series of small holes in the bottom for drainage.
While the glue is still drying, we’ll also install the top using this piano hinge. This will allow us to open the top to clean the birdhouse from time to time. We’ll cut it to length at the vice using our hacksaw, then install it where the top meets the back using some half inch stainless steel screws.
We’ve also cut a support block that we’ll glue and tack on the front with some brads. We’ll drill our access hole through this block. First draw a diagonal from corner to corner on the support block. Where these two lines meet is the center. Now we’ll use our spade bit to drill the hole. Directly below the hole we’ll use a Forstner bit to make a hole for our wooden peg perch. For more information, see our video “Drilling Holes 101.”
At this point we’ll call in the design experts to give it that personal touch that only they know how to do. What bird wouldn’t be proud to call this home. Now we’ll add a couple of feeders and a birdbath to entice them in and hang the birdhouse from our favorite tree. I wonder what kind of bird will eventually move in?
There you have it – a birdhouse with your kid’s personal touch on it, hung with care for all to see. Now you and your kids can watch and see which type of bird takes up residence first in your very first backyard birdhouse project.
Close Transcript
donot include a perch on your birf nesting house. brids don chixks or fledglings
ont need one and it gives predators like raccoons a way to wait
This is an amazing set of instruction. I will teach the same to my kid. He is 6 as of now but a quick learner. https://www.unilexconsultants.com/
I can count all limited points which is given in the reference of file explorer windows 10 but after being limited they are enough for give the full description about the file explorer windows.
very nice post
That’s really good and easy i think i am going to do this at my place. https://whizfortune.com/
Thanks for the article you posted on how to build a birdhouse. I was really impressed by your level of detail and the amount of work you put into it.
https://www.cedarroofvancouver.ca/
I really appreciate your post on how to build a birdhouse. I tried it out and everything came out right! Thanks for the great tutorial,
Chimney Repairs & Maintenance
Thanks for the great post on building a birdhouse. I’m looking to do a project with my son and this was perfect!
Roof Replacement Kamloops
I’m really glad you shared your knowledge with me; it’s fantastic to be here with everyone. This is generally one of the best soccer random.
Feel free about knowing something new on solar energy, solar power and, of course, solar panels