How to Build a Raised Bed Garden
Gardening can be tricky. You need the right type of soil and the right amount of sun. A raised-bed garden is many times an ideal choice. In this video, we’ll show you how to build a sturdy wooden frame for housing a garden full of flowers or herbs.

Pick out lumber. We recommend cedar because it’s rot resistant.
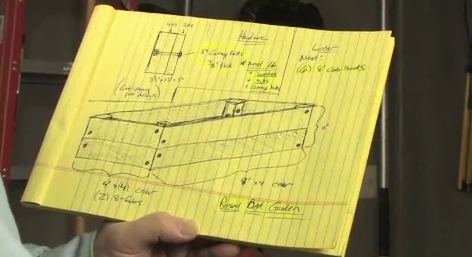
Sketch out your planned bed garden.
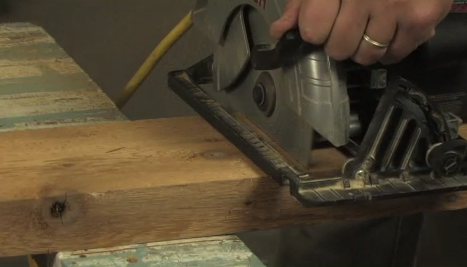
Cut the shorter sides to length with a saw.
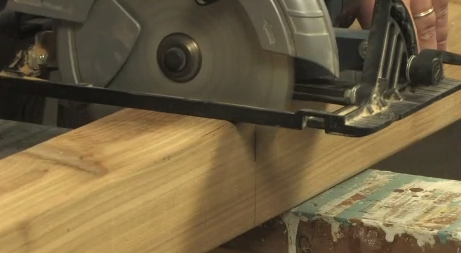
Cut the four corner posts to size.

Use a reciprocating saw to cut an angled point on one end. This part will be driven into the ground.
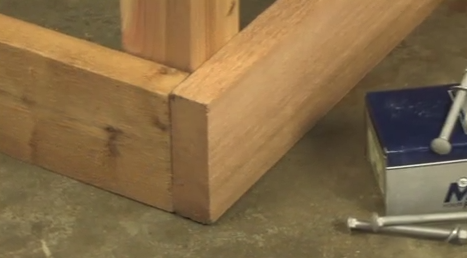
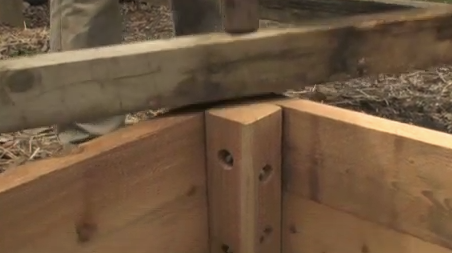
Fasten the boards to the post and each other. Use galvanized carriage bolts.
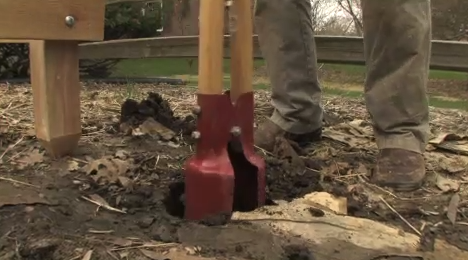
Dig holes for the posts.

Place the posts into the holes.
Drive the posts into the ground using a sledge hammer and a block of wood. Fill the hole with dirt.
Read Video Transcript
There are many benefits to raised bed gardening. First, a standard sized raised bed is small enough that it doesn’t take up your entire yard. Yet it’s big enough to grow a nice crop of herbs and vegetables. In addition, you can strategically place a raised bed where it will get the proper amount of sun. Finally, with a raised bed, you can control the soil mix to help ensure a bountiful harvest.
Today, we’re going to build a 4 by 8 foot raised bed out of 2 by 6 rough cedar boards. We’re using cedar because it’s naturally decay and rot resistant. We’ll fasten the boards to 4 by 4 posts using galvanized carriage bolts. Then we’ll find the right spot to place our raised bed so we’re ready when the growing season starts.
So let’s get started.
The first thing you need to do is to pick up some cedar 2 x 6s at your local independent home improvement retailer. The staff there can help you select lumber that is straight and not twisted or warped. We’re using 8-foot long pieces because our raised bed will be 8-feet long and 4-feet wide. Since we’re using 2 by 6s, we’ll need to two rows to get the proper height.
From a construction standpoint, this length eliminates having too much waste. Also, it’s a length that is manageable hauling it in my vehicle. It’s always a good idea to sketch out your project first to take into account the ideal length of lumber you’ll need, as well as how many pieces you’ll need so you can get everything in one trip.
We’ll start by placing the lumber on a pair of sawhorses and cutting the shorter pieces to length using a circular saw. If you don’t have a circular saw, you can also use a hand saw. We chose a width of 4 feet for our raised bed because it makes sense from a construction standpoint, as there will be no wasted material. Put a pencil mark at 4-feet, then, using that mark, make a mark across the entire board using a speed square. This will be the cut line for our circular saw. We’ll need to cut four of these pieces for the ends. It’s always a good idea to clamp the work piece to the sawhorses whenever possible.
Next, we’ll cut the 4 by 4 posts into to 2-foot lengths. That way, we’ll be able to get all four corner posts out of one 8-foot 4 by 4. My circular saw won’t cut all the way through a 4 by 4 post, so we’ll have to continue our mark around to the opposite side to make our cuts on opposite sides line up properly.
To be able to sink the posts in the ground, we’ll cut a 20 degree angle with our reciprocating saw on all four sides of the end of the post. This will make a nice pointed end we can sink into the ground.
To find this angle, we’ll use an angle gauge and a speed square. When you find the angle, tighten the nut on the angle gauge and transfer the angle to all four sides of the end of the post. Cut along these lines using a reciprocating saw. You can also use a hand saw for this, although it’s a lot more work. Repeat this for the other three posts.
We’ll fasten the 2 by 6 cedar boards to our posts using galvanized carriage bolts. These have a coating that will not rust. We’re also going to counter-sink the ends so they won’t stick out. We’ll do this using a 1-1/4” spade bit. We’ll need to be careful to position our carriage bolt holes so they won’t hit each other coming in from a perpendicular direction. To do this, we’ll alternate our marks at high and low points on the post at each corner for each 2 by 6.
Since our carriage bolts are 5 inches long, we’ll drill our counter sink holes about an inch and a half deep. This will ensure we have enough of the bolt coming through the post to get a washer and nut on it. To drill the counter sink holes, position the tip of the spade bit on the marks and drill to a depth of 1-1/2”, or approximately the depth of the spade bit.
Now we’ll clamp the post to our 2 by 6 and, with our 3/8 inch long drill bit, drill through the center of our courter sink hole out through our 2 by 6. Keep the drill level by positioning it perpendicular to the ground. Hammer the carriage bolts through the 2 by 6 and post and insert a washer and nut on the end of each bolt. Tighten it with a socket wrench using a deep socket, as a normal socket might not reach all the way into the counter sink hole. The good thing about using carriage bolts is that they won’t turn due to the square design under the bolt cap that grabs and holds the lumber.
We just have to repeat this 15 more times, on both tiers of 2 by 6s, making sure each end is secured to the post with a carriage bolt.
When you’re finished, get someone to help you position it where you want it, making sure it gets plenty of sun.
There you have it. Now it’s time to fill it up with your favorite mix of garden soil and other soil amendments and you’ll be ready to plant.
Close Transcript
Thank you so much for this. I was into this issue and tired to tinker around to check if its possible but couldnt get it done. https://akinator.ooo/ Now that i have seen the way you did it, thanks guys
with
regards
Great information, I will recommend it to my friends for them to check out. Thanks for sharing! If you have more time, please visit: wheel spinner
Hi all, need your help, I’m starting a guitar production facility and I need contacts for a waste removal company, do you know of one?
Hi, I’m sure I know how to help you. Here is the website of a waste removal company https://affordablewastemanagement.co.uk/small-business-waste-collection/. They are the best in the business, the prices are low and the quality is excellent. They care about the environment and don’t just burn the rubbish, they recycle all the waste. They have a lot of favourable promotions and offers, I think you will find something for you. They deal with all kinds of waste and even the most dangerous. I have been using their services for more than two years and I can say that they have never let me down. They pick up everything on time and without unnecessary problems.I hope I was able to help you. Have a nice day)