How to Clean Up After Painting
Your newly painted walls look great! But you’re not finished yet. Watch this video and learn how to clean up after your paint project so that your painting supplies will be ready when you’re ready to start your next painting project.
- Painter's Comb
- 5-in-1 Tool
- Hand Cleaner with Pumice
- Bucket
- Paint Brush Cleaner
- Spatula
- Tape
- Marker
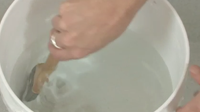
To clean a paint brush after using latex paint, fill a bucket with warm water and brush along the bottom to remove the paint.

Rinse with clean water. Discard water and refill.

Run a painter’s comb through the brush to loosen dried paint.

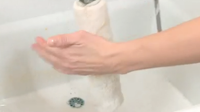
Rub hand soap or hand cleaner into the bristles for several minutes.
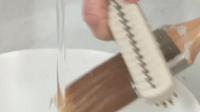
Use the painter’s comb again, cleaning the metal base of the brush.

Rinse until water runs clear.

Remove as much water from the brush as possible and reshape bristles with the painters comb.

Paint rollers: use the curved side of a 5-in-1 tool to scrap off as much paint as possible back into the bucket. If you used oil-based paint, discard roller.

Continue to use the 5-in-1 tool under warm water.
Spin the roller to remove water and wrap with protective material.

Store all remaining tools in one place so you can find them easily.

Scrape all paint from the tray/pail back into the paint can.

Seal paint and use a marker to indicate when and which room it was used in as well as were you purchased it. Store in a dry location where it won’t freeze.
Read Video Transcript
Now that the work is done and your walls look great, it’s time to clean up your tools so your brushes and rollers will be ready to go when you’re ready to start your next paint project.
In this video, you’ll learn the proper techniques for cleaning your brushes and rollers so that you can reuse them over and over again. We’ll also give you some tips on storing your unused paint so you’ll be able to identify it the next time you need to touch up those walls. So let’s get started.
Since you invested in quality paintbrushes, let’s start with the proper procedure to make sure they remain in top shape for your next painting project.
The first thing to remember is that paint can dry fast, so don’t wait too long before cleaning your brush. In fact, I like to clean them several times during the course of a job to avoid getting dried paint clogged in the brush.
Since we used latex paint for our recent project, let’s start with how to clean your brush after using latex paint.
If you have access to a utility sink, bring a bucket to the sink along with a couple of useful tools, including a painter’s comb and some hand soap or hand cleaner. First, fill the bucket with warm water. Then dip the brush in the water and brush the bottom of the bucket in both directions to remove as much paint as possible. Make sure the water is completely penetrating the bristles. Then rinse with clean water under the faucet. Discard the water and refill.
Next, with a painter’s comb, brush the bristles next to the metal ferrule to loosen any dried paint. First use the comb teeth, then the brush side. Repeat the process until the water runs clear.
Rub some hand soap or hand cleaner into the bristles, working it in with your fingers for several minutes. Use the comb to work out any remaining paint from inside the brush, especially down by the ferrule.
Rinse thoroughly under the warm running water while massaging the bristles with your fingers until the water runs clean.
Gently tap the brush to remove as much water as possible from the bristles. Then spin the brush in the palms of your hands. Brush the bristles one last time with the painter’s comb to reshape the brush back to its original shape. Then return the brush to its protective cover for storage.
If you used oil-base paint instead of latex, you’ll use the same basic process to clean your brush, using paint thinner or a solvent-base brush cleaner instead of water.
Now let’s get to work cleaning that roller cover. If you used latex paint, most quality roller covers will last for several uses if cared for properly. The best tool for cleaning roller covers is your 5-in-1 Painter’s Tool. In fact, the curve shaped side of this tool was designed for this specific application.
First, before you start cleaning, use the curved side to scrape out any remaining paint from the roller cover back into the paint can. You’ll be surprised how much paint is left in the roller cover. If you used oil-base paint, it’s probably best to discard the roller after this step.
Next, fill your bucket with clean water and continue to use the 5-in1 tool to scrape paint out of the roller, slowing rotating it as you go. After you’ve removed most of the paint, continue the process under warm running water until the water runs clean.
To remove water from the roller, put it back on the roller frame and give it an aggressive spin or two to fur out the nap. Then return it to its plastic sleeve for storage.
Next, put away any remaining tools and fold up the drop cloth for easy storage.
Now for the paint. Using an old spatula, scrape any paint from the paint tray or paint pails back into the can. Then seal the can tightly by gently tapping on the lid with a hammer or rubber mallet, and store it in a dry location where it won’t freeze. Rinse off the spatula.
On the can, don’t forget to use a marker to write the room painted, the date and the name of your local independent home improvement retailer where you purchased the paint. That way you’ll know where to go if you need more.
That’s it. Now your paint project is really complete. You’ve protected your investment and don’t have to worry about paint drying out your brushes and roller covers.
Close Transcript
Really nice tips with many detail photos and instructions.
Thanks a lot.
I clever tip I’ve learned as a decorator is to use foil to cover handles or lamps. It is incredibly handy to protect something you can not relocate. Another helpful tip I could add is to microwave old tape. This way you could rejuvenate glue gone old. I would also recommend sanding between coats as well, of course, if you have the time to leave each one dry properly.
Regards,
Dmitri, from Fantastic Handyman painters and decorators team:
https://www.fantastichandyman.co.uk/painting-decorating-services/
f you are in the quest for the portal which can let you know about how you can customize scree resolution in windows 10 so here it is which will show you easy steps for the same.
And then what do you do the paint laden clean-up water? Hint: its not going down the drain or anywhere on my property, like on the ground, gravel, grass or in tree wells. And dumps are 20 miles away.
sgd
xyxry
I usually hire professionals to do that job. Not that I don’t like to clean up after myself, but sometimes, I don’t have time for that. With achieveessays and BiblioJournals. Painting is just my hobby.
Can you clean all of your accessories like brush, roller, pails, pans, and pour the rinse water in the toilet or sink? I assume that latex affected water can be poured down a sanitary sewer.
Cleaning the paint brush after painting a wall has be a troublesome task for me. It gets hard and dry and require around 30mins to clean properly. Best Dissertation Writing Service
We make any folder on our desktop, so we think that it is no longer deleted where are recent documents windows 10 So for that we have to save that folder, its method is very easy.
What do you do with the dirty water in the bucket?
Thanks for sharing How to Clean Up After Painting. You share all the tips replated to cleaning after the paint . But you miss one thing which is very essential which is to DISPOSE OF OLD PAINT. We recently wrote a blog on it (https://www.dtmskips.co.uk/blog/how-to-dispose-of-old-paint/) Hope this helps you.
I would like to suggest DIY painters to try my unique product for assisting in paint brush and roller cleanup. My product is called the washbox and is essentially a ribbed plastic insert that fits in most sinks. The washbox has a drain in the bottom that aligns with the sink drain. Cleanup is contained inside the washbox and the sink is protected from paint stains. please check out the demo video at the following website https://thewashbox.ca/
Yeah why don’t you give real on the job tips! You spend that much time you fired……speed it up!
Hi, where do you thr
Good Day!! Thanks a lot for sharing your article with us.
This is one of the best articles I have ever read on this blog. Thank you for sharing very interesting information. slope
Are you hosting the in-laws (gulp!) or planning a legendary house party? Don’t let cleaning anxieties steal your spotlight! Professional cleaners are your secret weapon for a show-stopping home that will leave your guests speechless. Think of them as your interior design ninjas, wielding mops and vacuums like artist’s tools. They’ll transform your space into a masterpiece of cleanliness, with sparkling floors, gleaming windows, and surfaces so spotless they could reflect your guests’ awe. But wait, there’s more! Emop’s cleaning services come with a bonus perk – up to £150 cashback! Imagine using those savings to add a finishing touch to your gathering, like a beautiful bouquet of flowers or gourmet snacks. So ditch the cleaning worries and let the professionals handle the pre-guest reveal. Visit https://www.emop.co.uk and create a home that will be the talk of the town (in a good way!).