How to Replace a Flush Valve
If water from your toilet tank is leaking into the bowl, the first suspect generally is the flush valve. In this video, we’ll show you how to remove the tank from the bowl to replace a flush valve and stop the leak. If you need to replace your entire toilet, you may be interested in our How to Replace a Toilet video.
- Replacement Flush Valve
- Channel-Locking Pliers
- Adjustable Wrench
- Replacement Flapper
- Sponge
- Towels
- Bucket
- Penetrating Oil
- Large Slotted Screwdriver
- Plumber's Wrench

Remove lid from tank.

Shut off water by turning the shut-off valve clockwise.
Drain as much water out of tank as possible by holding flush lever down until toilet is completely flushed.

Sponge or towel out any remaining water in the tank. A shop vac also works well.

Disconnect water supply tube or hose to tank.

Disconnect flapper chain from tank lever arm.

Disconnect refill tube attached to top of overflow pipe.

Underneath tank, unscrew bolts that hold tank to bowl. You may need to spray them with some penetrating oil first before trying to loosen them.

Reach in tank with a long slotted screwdriver to keep tank bolt from turning while loosening nuts under tank with an adjustable wrench. Remove tank bolts.

Lift tank off of bowl and set aside on towel.

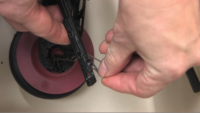
Underneath the tank, unscrew the locknut holding flush valve to the tank using a plumber’s wrench. Remove old flush valve.

Install new flush valve the same way you removed the old one, following manufacturer’s instructions.

Once installed, reattach tank to bowl with tank bolts.
Reattach flapper chain to flush lever arm.
Reattach fill tube to new overflow pipe.
Reconnect water supply to tank.
Turn on water, test new flush valve and check for leaks.
Read Video Transcript
If your toilet is leaking, the first suspect generally is the flush valve. Now if you’re not sure what the problem is, you might want to watch our video “Diagnosing a Leaky Toilet” to figure out which component inside the tank is leaking. Otherwise, stick around and I’ll show you how to install a new flush valve on your toilet.
The good news is that repairing a toilet is easy. It won’t cost you much or take up much of your time. As always, you’ll find all the parts and tools you need to finish this project, along with answers to your plumbing questions, right here at your local independent home improvement retailer.
The flush valve is in the middle of the toilet. When you push the lever, the flapper mechanism raises to let water out of the tank and into the bowl.
Some leaks can be fixed by simply replacing the flapper. If that’s all you think you need to fix the leak, check out the FAQs section of our website for more information.
Here, I’m going to show you how to replace the entire flush valve. That will include both the flapper as well as the seat that helps create the seal to keep water in the tank. To install it, you’ll need to remove the toilet tank from the bowl. Don’t worry this is easier than it sounds. So let’s get started.
First, take the lid off the tank.
Then shut off the water to the toilet by turning the shutoff valve clockwise.
Drain the water out of the tank by holding down the tank lever. Use a sponge or a towel to remove the water that doesn’t drain out. Now, disconnect the water supply to the tank. You may need an adjustable wrench or a pair of channel locking pliers to loosen the connection.
Disconnect the chain attached to the flapper. Also disconnect the refill tube that’s attached to the top of the overflow pipe.
Now, we’re ready for the most difficult part of the project: disconnecting the tank from the bowl. Underneath the tank, you’ll see bolts that go through the tank and bowl flange. Unscrew these, and be careful. If they are difficult to remove, use penetrating oil to loosen them. If you try to force them, you could break the tank. To keep the bolt from moving while you loosen the nut, use a large screwdriver to hold the top of the bolt inside the tank.
Once the bolts are removed, lift the tank away from the bowl and place it on a towel on the floor so you don’t scratch it. Tanks can be heavy, so you may need help with this step.
You’ll see there is a large rubber gasket between the tank and bowl. Remove this gasket and save it. Some kits come with a replacement gasket and some don’t. So keep it just in case. They can also be purchased separately.
Unscrew the large lock nut holding the flush valve to the tank. Again, be careful how much force you use, as you don’t want to break the tank. Use a plumber’s wrench or a large pair of locking pliers with adjustable jaws.
After you’ve removed the old flush valve, attach the new one pretty much the same way the old one came off. The rubber gasket goes on the inside of the tank to prevent it from leaking. The lock nut fits on the outside. Hand tighten the lock nut, then five it an extra ½ turn with the plumbers wrench. Don’t over-tighten or you may risk cracking the tank.
Use new brass tank bolts to attach the tank to the bowl. Hand-tighten the nuts evenly and remember not to over-tighten them or you risk cracking the tank.
Connect the flapper chain to the tank lever, leaving some slack for when the flapper is closed. Then, reconnect the water supply tube to the overflow pipe, turn on the water, and your toilet should work like new.
If you have questions about this or any other home improvement project, be sure to read our list of Frequently Asked Questions for this video. And be sure to print out our Project Instructions, which includes a Tools and Materials checklist, before visiting your local independent home improvement retailer. That’s where you’ll find all the products and helpful advice to complete your project. If you’re not sure where to find your local store, check out our Store Locator.
Good luck with your project and thanks for watching.
Close Transcript
Nice blog..! these vedio was really awesome to learn how to replace a flush valve. I think it was also very helpful vedio for us. Thanks for sharing this informative post.
our tank won’t just go back on without it leaking when we get water back in tank.” …we even went and got new gasket for between the tank and tioelt new bolts and nice washers…..but still leaks — thought it was due to unevenness or something but nothing seems to work…screws too tight? screws too lose? what??
order of assembly can be important. The gasket goes on the bottom of the flush valve first. The one I did today had a rubber washer between the tank and the screw head, then a metal washer and nut to hold that part all together. Now set tank on bowl and add rubber washer, metal washer and nut. Tighten to compress the gasket, evenly on both sides. Worked for me
I am having the same issue. I have put everything on in the right order and it still leaks into the tank. Is there a too tight or too loose when putting on the nuts or screw head under the tank?
you have solved the water leaking issue for every one! The video made it real simple. thanks for the tip.
replaced fkush vakue , when wter added to tank continue to leah and refill , what did ii do wrng
Thank you very much for the post. It really helped.
You didn’t replace with the same kind of triangular gasket. I tried to replace mine with the same kind of gasket from kohler. The triangular one. It is still leaking. Should I just keep cranking the nut ? Do I install the locking nut to the valve first to the tank and then the gasket over it or place gasket and then lock nut. Thanks for your help.
My toilet isn’t leaking but the flush valve has a high pitched squeaking sound when I flush the toilet. It’s pretty loud and like chalk on the chalkboard. Any suggestions?
That’s not the flush valve, that’s the fill valve, different video
You don’t need to take the tank off of the toilet, just replace the flapper valve portion and leave the refill tube alone! Then just replace the flush valve unit and the aforementioned flapper valve and you will save time and headache! And instead of using a sponge or towel first, try using a small rubber, Styrofoam, or plastic cup or bottle (pill or yogurt) to extract most of the residual water first and then use a sponge or towel. Dump the water right back into the toilet instead of using a bucket to save extra time and trouble.
Suggest you not suggest this to others, some toilets require you to remove the tank from the toilet in order to remove the flush valve
Hi 👋🏽,
Thanks for the informative post.
I replaced my fill valve and I am experiencing some leaks at the water supply connection. I placed the fill valve in and secured it with the lock nut. The instructions said to not make it too tight so I stopped tightening when I heard the creaking sound. Then I proceeded to connect the water supply line but there is a leak from the supply valve nut. Tried to undo the whole set up but when trying to unscrew the supply valve nut, the fill valve in the tank also rotates. How can I take this apart without the fill valve moving or rotating? Basically, how to undo the whole installation so I can tighten the lock nut better if needed, and the supply line as well so there are no leaks.
If the supply line is plastic or metal tube then replace it with a 12 ” braided supply hose, if that’s not the case make sure the fill valve is seated completely and tighten until you cant tighten it anymore with your hand, then if it still leaks give it a half turn with a pair of pliers
Replace all parts, once i got the top part of bowl to refill with water i was clear of leaking. Until i flushed! Water poured from the bottom of it. How can i fix this issue?
[…] the tank. Newer toilets tend to come with the flush assembly and handle installed, but if not, you’ll need to put the toilet’s flush assembly and handle together. If everything is installed correctly, you’re ready to secure the tank to the bowl. Start the […]
I’m looking for a wrench/plier (same as the one at 3:12 in the video above) to loosen the large nut at the bottom of the tank. I don’t seem to find at any of the hardware stores nearby. Can’t seem to find on the Internet as well. Any idea which store might carry this? Thanks!
I replaced the flush valve and it still is leaking into the toilet bowl. Any suggestions.
Thank you for pointing out that you need to drain as much water as possible. Getting your valves repaired seems very important. Hopefully, anyone having issues with this looks into finding the best contractor to come and fix it for them.
Hi, thanks for informative post.
A complete guideline from you, Your step by step explanation help me more to understand the total matter and solve it. please keep it up.
I have replaced the flush valve and the flapper. My toilet still leaks., but the water is not on the floor. I tried the color test and the water in the bowl did not change color. where is the water going? How can I solve the problem?
I have a tank that has a hole that is smaller than 2″. The flush valves at Lowe’s and home Depot only go to 2″. What’s the solution here?
Hi, I have replaced the flush valve but there is still a tink constant drain into the bowl. The two screws with wing nuts are new as are the rubber washers that go with them and they won’t tighten any more. The fixing under the tank is screwed in solid too. I feel it will break if I try to tighten any more. Could the new flush valve be faulty. I’ve been at this 2 days now and am very frustrated.
Tink?? Should say tiny
Nice. This step by step guide helped me a lot. Very helpful for diyers like me.