How to Replace a Kitchen Faucet
Your kitchen faucet is probably one of the most-used fixtures in your home. If your faucet has seen better days, or if it’s out of style, watch this video to learn how to replace it yourself. It’s not that hard, and it can transform the look of your kitchen in just a couple of hours.

Turn off the hot and cold water shut-off valves. These are usually located in the cabinet directly under the sink.

Open up the faucet to relieve the pressure.

Use an adjustable wrench and a pair of channel locking pliers to disconnect both of water lines from the faucet. If supply lines are old and gaskets worn out, consider replacing them with flexible supply lines.

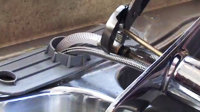
Use a basin wrench or a socket wrench to remove the nut holding the faucet tailpiece assembly in place.
Disconnect the line that connects the hose to the faucet, if your sink has one.

Pull the old faucet out and clean the surface of the sink.

Measure the distance, center to center, of the outside holes of your sink to make sure the new faucet will fit. Read any instructions that come with your new faucet.

Seal the new faucet: if using a gasket, put the gasket on the lip of the plate and thread the hoses through. If using plumber’s putty, apply around the base of the faucet and set it in place.

Underneath the sink, thread on the flange and nut with a basin or socket wrench.

For pull-out faucets, add a weight that will retract the pull-out spray.
Attach supply lines to the faucet and then to the shut-off valves. Hot water connects on the left, cold on the right.
Turn on the water. If you find any leaks, tighten connections on the water supply line.
Read Video Transcript
A new faucet is a great way to give a fresh look to a kitchen or bathroom. Your local independent home improvement retailer has a variety of styles to choose from, from the simple to the extravagant, and we can often special order, so you get just what you want.
Plus, installing a new faucet is an easy project for a beginning do-it-yourselfer. In this video, we’ll show you how to install a basic, pull-out faucet in your kitchen sink. But before we get started, here are a few things to keep in mind.
Even though we’ll be installing a faucet in the kitchen, the same principles apply to installing any faucet. Also, you should know that different faucets may have different configurations. For example, bathroom faucets may have a pop-up drain attached. Some faucets have a single handle, or a mixer, and others have two handles.
Whatever the configuration of your faucet, you’ll always be hooking up the hot and cold water lines as well as a bolt that holds the faucet to the sink.
You’re going to need a few basic plumbing tools for this project, so be sure to check out our Tools and Materials checklist for a complete list of everything you need.
Let’s get started by removing the old faucet. Like with most plumbing projects, we’ll start by turning off the hot and cold water shut-off valves, which are usually located in the cabinet directly under the sink. When you’re finished, open up the faucet to relieve the pressure.
Next, use an adjustable wrench and a pair of channel locking pliers to disconnect both of water lines from the faucet. If you suspect the supply lines are old and gaskets worn out, you might consider replacing them with flexible supply lines like the ones I’m holding here.
Underneath the sink, use a basin wrench or a socket wrench to remove the nut holding the faucet tailpiece assembly in place.
If your existing faucet has a spray hose, you’ll also want to disconnect the line that connects the hose to the faucet. Sometimes it’s easier to pull the faucet out and disconnect it from above.
When you’re finished pull the faucet out and clean the area on the sink where the old faucet was located.
Now you’re ready to install the new faucet. Most sinks today have three holes to accommodate the faucet. Measure the distance, center to center, of the outside holes of your sink to make sure the new faucet will fit. And always be sure to read the manufacturer’s instructions.
When you set the new faucet in place, you’ll need something to seal the base. Some faucets, like ours, have a gasket that goes between the sink and the faucet. If yours does not have one, apply a bead of plumber’s putty along the groove around the plate. This will keep water from dripping down into the sink cabinet.
If you have a gasket, put it on the lip of the plate, and with the plate in place, go ahead and thread the hoses through the plate and place the faucet on the sink.
Underneath the sink, thread on the flange and the nut that will hold the faucet to the sink using a basin wrench or a socket wrench. If you’re installing a pull out faucet, you’ll also need to add the weight that will retract the pull-out spray back into the faucet and connect the pull out spray water lines.
Next, attach the supply lines to the faucet and then to the shut-off valves below. Remember, hot water goes on the left and cold water connects on the right. You can also attach any accessories, such as a spray hose or, in this project, a soap dispenser, if your faucet came with one.
Finally, it’s time to turn on the water and check for leaks. If you find a leak, more than likely you’ll need to tighten the connections on the water supply lines.
If you have questions about this or any other home improvement project, be sure to read our list of Frequently Asked Questions for this video. And be sure to print out our Project Instructions, which includes a Tools and Materials checklist, before visiting your local independent home improvement retailer. That’s where you’ll find all the products and helpful advice to complete your project. If you’re not sure where to find your local store, check out our Store Locator.
Good luck with your project and thanks for watching
Close Transcript
Thanks for the tips. I really appreciate this. But when it comes to plumbing, I proudly recommend No Problem Plumbing and Drain. They can provide what you wanted. Wanna try their service? Then visit this site : http://plumbingbidsdenver.com Thank you!
Thanks for providing us this information. Very helpful and insightful. It helps me a lot. Many thanks. I think I can do it alone because of this instructions and guidelines. And if you are looking for plumbers denver then visit this site: http://emergencyhvacdenver.com Thank you!
This is good but may I suggest No Problem Plumbing and Drain for plumbing services. You can call us @ 303-993-1600 or visit us @ http://plumber-denver-co.com . Thank you!
Sir,
I am trying to convert my kitchen sink from a double sink to a single farmhouse
But I have two drains and the single I have has one drain in the center. Can you provide instructions on how to convert two drains to single drain. Thank you
I am a 60 year old widow and with your help I changed out my kitchen faucet in less than 20 minutes. Just one set back, I had to break off one of the black nuts on the flanges and the water was originally connected backwards. Haha. Piece of cake. If I can do it anyone can .
I found this is an informative and interesting post so i think so it is very useful and knowledgeable. I would like to thank you for the efforts you have made in writing this article.
Help! My faucet doesn’t have a tailpiece. instead there’s just a solid cap with no ridges.
Great illustrations and tips. Easy for the diy mom to work from. I will be following all your blogs. Thanks
Thank you!!!!! I have had this on my to-do list since summer and this is the exact motivation I needed to get this done this weekend. Perfect timing!
oh..and we used a basin wrench. made it so much easier…and my husband handed me the tools and held the faucet in place….girl power!
My valve on my kitchen sink has a plastic part that holds on/off lever in place…..that’s what I need to replace. Can you help?
I have a now extinct Moen 7400 that the spout
broke compleaty off rusted
I’m trying to replace it with a Moen # 87130
Among the tools I’m going to need it requires
“Flexible supplies” is that just hoses ?
and is there a specific size I’m going to need for a kitchen faucet ?
Thanks for the tips on fixing faucets. Here is a good resource for finding a top quality brand from the start: http://fitartfun.com/top-5-faucet-brands-for-bath-or-kitchen/
I am trying to replace the faucet in my kitchen and couldn’t seem to find the right wrench to use. I’m glad I stumbled across this post. It’s also helpful to know that I not only is the right wrench important but a pare of channel locking pliers is needed. That is something I didn’t think about. Thanks for the helpful instructions.
What wonderful tips, was here trying to change my faucet broke, but I decided to do a search on the internet and soon I found your tips, solved my problem, thanks for sharing!
Thanks guys for be the best in the business. The way you describe and added pictures, its very interesting and simple to me. Thanks for be simple to us.
Very good tips, especially for a housewife like me that the husband is not always at home to solve.
Your blog is beautiful, I really liked it!
Thanks for sharing this informative and usefull article. I just have a problem wit that and this content is so useful for me.
With Best Regards,
Como Remover Tatuagem
Very good tips, especially for a housewife like me that the husband is not always at home to solve.