How to Replace a Toilet
Has your toilet seen better days? Is it wasting water with every flush? If you need to replace a toilet that’s old, worn out, or out-dated with a new one; it’s is easier than you think. In this video we’ll give you the basics of removing and re-setting your toilet.
- New Toilet
- New Flush Valve
- New Fill Valve
- Wax Ring
- Adjustable Wrench
- Channel Locking Pliers
- Screwdriver
- Towel
- Sponge
- Bucket
- Penetrating Oil
- Putty Knife
- Hold-Down Bolts

Turn off the water to the toilet.

Remove the tank lid.
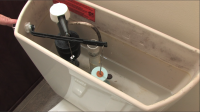
Remove the refill tube from the overflow pipe and drain water from the tank.

Use a rag to pick up any remaining water.

Disconnect the water supply line.

Disconnect the flapper chain.

Unscrew bolts attached to the tank.

Remove tank from the bowl and place on a towel.

Remove the caps sitting on the bolts.

Unscrew nuts with an adjustable wrench.

Rock the bowl a bit to loosen the grip on the floor and place on a towel.

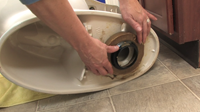
Remove wax ring from the toilet and the floor. Clean the floor around the drain hole.

If the bolts look rusty, replace them.
Place a new wax ring on the new toilet and carefully position on top of the drain hole. You only get one shot to place it. Replace wax ring if you miss.

Gently rock the bowl until it sits level on the floor.
Assemble everything together in the reverse order that you took it apart.
Turn the water back on and test the new toilet for any leaks.
Read Video Transcript
Changing out your toilet is a project that will only take you a few hours. You may want to give your bathroom a new look with a new toilet. Or, you may need to fix a leak by replacing the wax ring. In either case, here I’ll show you how to replace a standard, two piece toilet with a tank that mounts on top of the bowl. If you have different type of toilet, consult with your local independent home improvement retailer for further advice.
Most of this video will demonstrate how to replace the wax ring, a critical part of replacing the toilet. The wax ring creates a seal between the toilet bowl and the drain in the floor.
The other two videos you’ll want to watch are “Installing a Flush Valve” and “Installing a Fill Valve.” Both of these projects will be part of the complete toilet installation.
Let’s get started by removing the old toilet. First, take off the lid to the tank and shut off the water. Drain the water out of the tank by holding down the flush lever. Then use a sponge or a towel to get the rest of the water out.
Next, disconnect the water supply from the tank. You may need an adjustable wrench or a pair of channel locking pliers for this step.
Now we need to remove the toilet from the floor. Remove the caps that sit over the bolts at the bottom of the toilet bowl. Then, using an adjustable wrench, unscrew the nuts.
Loosen the bowl by rocking it to break its seal with the floor and toilet flange. Once it’s loose, pull the entire toilet up until it clears the bolts on the floor. Toilet bowls can be heavy, so you might need some help with this step.
You might also want to remove the tank first to make it lighter, as I have. To do this, underneath the tank, you’ll see bolts that go through the tank and bowl flange. Unscrew these, and be careful. If they are difficult to remove, use penetrating oil to loosen them. If you try to force them, you could break the tank. To keep the bolt from moving while you loosen the nut, use a large screwdriver to hold the top of the bolt inside the tank.
Once the bolts are removed, lift the tank away from the bowl and place it on a towel on the floor so you don’t scratch it. Tanks can be heavy, so you may need help with this step.
Have a towel handy, as there may still be some water stuck in the trap that could spill on the floor.
The next step is to remove the old wax ring. Tip the toilet to the side to get the wax ring off of the bottom of the toilet. Then remove any of the wax that may be stuck to the flange in the floor. Use a putty knife and paper towels to do this.
You’ll also want to wipe the floor where the toilet was sitting and remove any caulk or putty that may have been used around the edges of the toilet.
If the bolts that hold down the toilet are still in good condition, you can reuse them. If they are rusty, consider replacing them.
The toilet goes back on basically the way it came off. Place the new wax ring over the drain hole in the floor with the rounded side up. You also can create a seal with the wax ring around the edge of the bowl’s base, which is what I’m going to show you today.
Carefully line up the toilet over the flange. Lower it gently, making sure the bolts in the floor pass through their openings in the bowl base. As the bowl meets the floor, make sure it is level and square with the rear wall. Don’t raise the bowl from the floor while making adjustments. You only get one shot at setting the bowl per ring. If you break it by pulling the toilet back up, you’ll have to go through the setting process all over again and replace the ring.
As you set the bowl, gently rock the bowl until it sits completely on the floor.
Place washers over the hold-down bolts and thread on the brass nuts. Tighten the nut with your hand, then finish it off with an adjustable wrench. Over tightening could break the bowl. Put the plastic caps back on for decoration, and also to keep water off the bolts.
Finally, put the tank back on inserting the brass tank bolts into the bowl and hand-tightening the nuts evenly. Remember not to over-tighten them or you risk cracking the tank.
Reconnect the water supply and turn on the water. Then test the toilet to make sure it’s not leaking between the tank and the bowl, and especially where the base meets the floor.
If you have questions about this or any other home improvement project, be sure to read our list of Frequently Asked Questions for this video. And be sure to print out our Project Instructions, which includes a Tools and Materials checklist, before visiting your local independent home improvement retailer. That’s where you’ll find all the products and helpful advice to complete your project. If you’re not sure where to find your local store, check out our Store Locator.
Good luck with your project and thanks for watching.

This is a great video.
We have a NEW WAXLESS toilet seal.
It is extremely EASY to install and made of flexible, durable material with a medical grade water-proof coating that is guaranteed to last.
It’s designed to hold the bolts up and stay in place making it extremely easy to set the toilet. If you forget something you can pull the toilet back up and reset it on the same Sani Seal.
It works on every flange on the market, even cast iron.
We won Retailers Choice award at the National Hardware Show and Sani Seal Toilet Gasket is MADE IN USA.
Please check out our website at http://www.sanisealgasket.com
Hello, my name is Reggiie I resently had to remove the tank from my bowl. Now Im having a hard time stopping the leaking when reinstalling the tank. what.s my problem? Reggie.
The video was great.
We sell quite a few also on our site and receive emails on how to install them, Good video. http://www.theshoppingking.com and click on industrial
Replace spud, tank bolts and washers. Good as new
http://www.shogunservices.com
I found a great new invention called the Toilet Jax Toilet Lowering System. You never have to suspend the toilet in the air over the flange trying to see bolts you can’t see or “rock” the toilet which can muck up the ring. Nope. This product does it for you and installs the toilet onto the wax ring perfectly every single time. Pretty cool technology and it sells for like $5-8 online. It’s re-usable too.
You should do a video using it! I think that would be helpful!
Lol, what an idiot.
Thank you, excellent video !!!
great video reggie
I’m a single 49 yr old going to try and uninstall and install a new toilet. What is the best toilet to buy when your on a budget and will not have to replace for years or never?
How do I replace a cone flush valve, on a toilet, and is it possible to replace with a standard valve with a flapper?
Do you have any trick to get the remaining water out of the bowl or is dabbing it out with a rag the only solution?
Wet/dry vac or sponge
Use a shop vac. All the water is gone and no dripping rags.
I am replacing a toilet with about a 2.5 inch bottom hole with one which has a 1.75 inch hole in the bottom. The wax ring and plastic sleeve seems to fit the pipe well, but the new toilet hole is much smaller than the plastic sleeve. Will this cause a leakage issue?
Why do you have to clean off the wax on the bottom of toilet if your replacing the toilet?
the old wax won’t adhere to the new wax. if you don’t clean off the old wax you won’t get a good deal and it may leak.
*you won’t get a good seal
We replace my toilet, but it is unsteady. what are we doing wrong?
How do you mean unsteady? Are the bolts holding down the toilet pot firm enough?
If you don’t have a putty knife to remove the old wax, is there an alternative option I can use?
butter knife..spatula..spoon..small garden shovel..your hand..a cd case..a cd..pretty much anything flat and stro ng enough to scoop and scrape the wax without breaking
Very informative info. Great step by step. Thanks for sharing.
Great video, it’s very helpful for replacing damaged or out-dated toilets but I find many new homeowners replace toilets that are perfectly operational just to have something nicer looking. For anyone that wants to pinch some pennies, I have a great post on how to rejuvenate toilets and make them look brand new.
http://pvcguy.com/resurrect-neglected-toilet/
Wow, excellent video. Will definitely recommend this video to clients.
Video said nothing about length of bolts and that they need to be cut off to correct length.
Thanks, very helpful. But aren’t you missing a small but important step 1.5? After shutting off the water, flush the toilet.
All very simple and straight forward in the video…piece of cake….. but not so much in reality. Hire a plumber. lol
Am I the only one who noticed the caked-on dried urine that was left there underneath? (1:58 & 5:17) Gag! And wear gloves, lady!
Is it really necessary to remove the tank from the back? I’m moving old one to another bathroom and replacing the one I’m taking out with a new style.
Thank you for this tutorial. I am on a mission in life to learn to be as self-sufficient as possible. I live alone and hate to pay for services that I can do myself. I am going to add this to my list. I have a toilet to replace and this tutorial will help me for sure.