How to Replace a Toilet
Has your toilet seen better days? Is it wasting water with every flush? If you need to replace a toilet that’s old, worn out, or out-dated with a new one; it’s is easier than you think. In this video we’ll give you the basics of removing and re-setting your toilet.
- New Toilet
- New Flush Valve
- New Fill Valve
- Wax Ring
- Adjustable Wrench
- Channel Locking Pliers
- Screwdriver
- Towel
- Sponge
- Bucket
- Penetrating Oil
- Putty Knife
- Hold-Down Bolts

Turn off the water to the toilet.

Remove the tank lid.
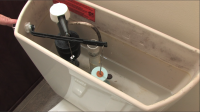
Remove the refill tube from the overflow pipe and drain water from the tank.

Use a rag to pick up any remaining water.

Disconnect the water supply line.

Disconnect the flapper chain.

Unscrew bolts attached to the tank.

Remove tank from the bowl and place on a towel.

Remove the caps sitting on the bolts.

Unscrew nuts with an adjustable wrench.

Rock the bowl a bit to loosen the grip on the floor and place on a towel.

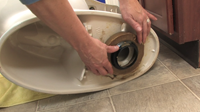
Remove wax ring from the toilet and the floor. Clean the floor around the drain hole.

If the bolts look rusty, replace them.
Place a new wax ring on the new toilet and carefully position on top of the drain hole. You only get one shot to place it. Replace wax ring if you miss.

Gently rock the bowl until it sits level on the floor.
Assemble everything together in the reverse order that you took it apart.
Turn the water back on and test the new toilet for any leaks.
Read Video Transcript
Changing out your toilet is a project that will only take you a few hours. You may want to give your bathroom a new look with a new toilet. Or, you may need to fix a leak by replacing the wax ring. In either case, here I’ll show you how to replace a standard, two piece toilet with a tank that mounts on top of the bowl. If you have different type of toilet, consult with your local independent home improvement retailer for further advice.
Most of this video will demonstrate how to replace the wax ring, a critical part of replacing the toilet. The wax ring creates a seal between the toilet bowl and the drain in the floor.
The other two videos you’ll want to watch are “Installing a Flush Valve” and “Installing a Fill Valve.” Both of these projects will be part of the complete toilet installation.
Let’s get started by removing the old toilet. First, take off the lid to the tank and shut off the water. Drain the water out of the tank by holding down the flush lever. Then use a sponge or a towel to get the rest of the water out.
Next, disconnect the water supply from the tank. You may need an adjustable wrench or a pair of channel locking pliers for this step.
Now we need to remove the toilet from the floor. Remove the caps that sit over the bolts at the bottom of the toilet bowl. Then, using an adjustable wrench, unscrew the nuts.
Loosen the bowl by rocking it to break its seal with the floor and toilet flange. Once it’s loose, pull the entire toilet up until it clears the bolts on the floor. Toilet bowls can be heavy, so you might need some help with this step.
You might also want to remove the tank first to make it lighter, as I have. To do this, underneath the tank, you’ll see bolts that go through the tank and bowl flange. Unscrew these, and be careful. If they are difficult to remove, use penetrating oil to loosen them. If you try to force them, you could break the tank. To keep the bolt from moving while you loosen the nut, use a large screwdriver to hold the top of the bolt inside the tank.
Once the bolts are removed, lift the tank away from the bowl and place it on a towel on the floor so you don’t scratch it. Tanks can be heavy, so you may need help with this step.
Have a towel handy, as there may still be some water stuck in the trap that could spill on the floor.
The next step is to remove the old wax ring. Tip the toilet to the side to get the wax ring off of the bottom of the toilet. Then remove any of the wax that may be stuck to the flange in the floor. Use a putty knife and paper towels to do this.
You’ll also want to wipe the floor where the toilet was sitting and remove any caulk or putty that may have been used around the edges of the toilet.
If the bolts that hold down the toilet are still in good condition, you can reuse them. If they are rusty, consider replacing them.
The toilet goes back on basically the way it came off. Place the new wax ring over the drain hole in the floor with the rounded side up. You also can create a seal with the wax ring around the edge of the bowl’s base, which is what I’m going to show you today.
Carefully line up the toilet over the flange. Lower it gently, making sure the bolts in the floor pass through their openings in the bowl base. As the bowl meets the floor, make sure it is level and square with the rear wall. Don’t raise the bowl from the floor while making adjustments. You only get one shot at setting the bowl per ring. If you break it by pulling the toilet back up, you’ll have to go through the setting process all over again and replace the ring.
As you set the bowl, gently rock the bowl until it sits completely on the floor.
Place washers over the hold-down bolts and thread on the brass nuts. Tighten the nut with your hand, then finish it off with an adjustable wrench. Over tightening could break the bowl. Put the plastic caps back on for decoration, and also to keep water off the bolts.
Finally, put the tank back on inserting the brass tank bolts into the bowl and hand-tightening the nuts evenly. Remember not to over-tighten them or you risk cracking the tank.
Reconnect the water supply and turn on the water. Then test the toilet to make sure it’s not leaking between the tank and the bowl, and especially where the base meets the floor.
If you have questions about this or any other home improvement project, be sure to read our list of Frequently Asked Questions for this video. And be sure to print out our Project Instructions, which includes a Tools and Materials checklist, before visiting your local independent home improvement retailer. That’s where you’ll find all the products and helpful advice to complete your project. If you’re not sure where to find your local store, check out our Store Locator.
Good luck with your project and thanks for watching.

“Printable instructions?” Don’t make me laugh. Click here to waste 5 pages!
Nice information here. I learnt more than before already. I faced an issue with the tank but i have fixed it already. Thank you.
It was great that you provided the information regarding what needs to be done in order to replace the toilet properly. I especially liked how you mentioned shutting off the water and draining the water by holding down the flush lever. I know many people can forget that. However, since I am not very confident of my DIY skills and since I got hurt the first time I tried, I plan on hiring someone else to do it. We’re planning to replace the toilet because we got the bathroom remodeled earlier and realized that the toilet does not suit the design of the bathroom.
TMI
Your rambling. Who cares??
While we’re all being inane and dissing other people’s comments, it’s *you’re
I never thought someone would get into their life story on a toilet replacement conversation thread.
Thank , I have two screws That I cannot take off due to a plastic bolt that underneath the toilet seat,it’s so rusty, the rubber plastic bolts a broke , any advice?
wow, excellent Badsanierung Augsburg ideas. The quality of this video is very good.You can get more information on this type.please visit our website or call 0176 5845617.
An exceptional video you have shared that is really helpful.After watching these videos anyone will get an idea how to set up or replace a toilet easily.
Bowl to tank nuts are generally removed with a 7/16 wrench.
Bowl to floor depending on your anchor bolts will require a 1/2″ or 9/16″ wrench to remove the nuts.
Once the bowl is seated and both side anchor bolts are hand tight turn no more than 90 degrees tighter.
Anti seize on the anchor bolt threads never hurts
A small amount of silicone on the tank to bowl bolt rubber seals is also cheap insurance.
My rough in is only 11″ from the wall. Currently, the toilet tank is flush against the wall. Will a 12″ rough in on a new Kolher fit the same way or do they make toilets with a 10″ or 11″ rough in measurement?
Excellent. Absolutely loved reading and very helpful at the same time.
Thank you for this post. I am on purpose in life to get to be as self-sufficient as probable. I live alone and hate to pay for help that I can do myself. I am working to add this to my list. I have a bathroom floor to renew and don’t want to work around the toilet; I want to take it out.
my eyes glued to this post it is really amazing glad to see it
Amazing. Your post is very helpful for the people. I like your post. Thank you for share such helpful post.
Thanks a lot for giving me such a blog and information about to install the bidet toilet seat. What a fabulous explanation. I really inspired to your on your great post. please keep it up.
I like the valuable info you provide to your articles.
I will bookmark your blog and take a look at again here frequently.
I am reasonably sure I will be informed many new stuff proper right here! , Best of luck for the next!
Hi, I am a fan of your plumbing tutorials. Today’s video on replacing toilet has made me clear about toilet replacement. Thanks for the video. Can you please make another video about how to change wall mounted toilet please. Thanks in advanced for your help.
Loved your post! I have written a post on the same topic, but love your post formatting! Easy on the eyes and straight to the point! Keep up the good work!
thank you for the article
Great article. I really appreciate the efforts put into writing this… You’re the best.
Thank you for sharing your knowledge and update.
I adore this online journal!! The blaze up the top is wonderful!!