How to Sweat Copper Pipes and Fittings
If your home has copper plumbing, then you should know how to fix it if something needs repaired or if you’re running new lines to a fixture. Sweating copper isn’t that hard, and it’s kind of fun. Watch this tutorial video for the basics on how to sweat copper.
- Copper Pipe
- Copper Fittings
- Propane Torch / Propylene Torch
- Flux
- Flux Brush
- Lead-Free Solder
- Hacksaw
- Channel-Locking Pliers
- Sandpaper
- Tubing Cutters
- Pipe Reamer
- Wire-Fitting Brush
- Towel
- Vice

Cut the pipes to the right length using a hacksaw or a copper tube cutter.

Remove the burs with a wire brush or file.

Clean the end of the copper pipe with a special cleaning brush. Clean until the surface is bright all around.

Clean the inside of all fittings.

Apply soldering paste to the cleaned ends of the pipe and the insides of the cleaned fittings.

Attach the fitting to the end of the pipe and use a propane flame in the middle of the fitting to heat both ends at the same time. Don’t apply heat directly to fluxed area.
Still using the flame, solder the joints together. You only need a little bit around the whole circumference of the tube.
Wipe excess solder away with a rag.
Read Video Transcript
There will come a time in the course of a do-it-yourself plumbing project when you will need to connect copper water supply lines. Instead of calling a plumber to do the work, maybe it’s time to stretch your plumbing skills a little bit and lean how to do it yourself. It’s really pretty easy, and with the right tools and know-how from your local independent home improvement retailer, you’ll be sweating copper in no time.
Today I’m going to show you the basic method for sweating copper pipe. We’ll discuss how to cut copper pipe, we’ll talk about copper fittings, and how to solder these components together.
So let’s get started.
Copper pipe (or tubing as it is called) is joined together using copper fittings. There are a variety of fittings designed to make turns and bends in pipe, or to branch out in various directions. These are just a few of the types of fittings that are available in ¾” and ½” sizes.
We’ll start by learning how to cut copper tubing. To cut copper tubing, you can use either a hacksaw or a copper tube cutter designed specifically for this task. Although both will make a satisfactory cut, the tube cutter ensures a square cut every time and leaves fewer burs. When using a tube cutter, hold the copper tubing in place with a vise or a clamp, being careful not to distort the copper. This tube cutter uses a screw motion to tighten the cutting wheel against the pipe as it is turned. Several rotations and the piece is cut. This cutter is designed to work in tight areas where there isn’t room to spin the larger cutter. Having both on hand is a good idea.
After making the cut, we need to remove the burrs inside the pipe. A wire brush designed for this specific purpose makes easy work of it. If you cut copper pipe with a hacksaw, you may want to use a half-round file to perform this task, as the hacksaw leaves more burrs than the tubing cutter as you can see here.
When cutting pipe for a specific run, you’ll need to make allowances for how much the fittings increase the overall length of the run. While it depends on the fitting, a general rule of thumb is to add about a half inch for each fitting to the length of pipe you cut.
After you’ve cut the copper pipe to the proper length, clean the end of the pipe with this special cleaning brush. Clean the area to be inserted in the fitting until it is bright all around. Turn the tool back and forth until the pipe is bright. You can also use sandpaper or steel wool to accomplish this task.
You must also clean the inside of all fittings. You can use the wire brush, steel wool or sandpaper. Take the time to clean them thoroughly. Debris or foreign matter left in the pipe causes a poor seal.
Next, apply a light coat of flux or soldering paste to the cleaned end of the copper pipe. Use a flux brush to spread the flux. Flux or soldering paste ensures a firm bond between the copper and the solder and will help will keep the copper from oxidizing when heated. Also apply flux to the inside of the cleaned fittings using the same technique. Place the copper fitting on the pipe only after it is thoroughly cleaned and coated with soldering paste. When the fitting is firmly in place, rotate both the pipe and the fitting several times to spread the flux evenly.
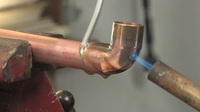
A propane torch is the tool we’ll use to sweat copper pipe. If you look at the flame of torch you will notice there is a lighter blue, well-defined flame in the middle of a darker blue flame. The tip of this light blue flame is the hottest part of the flame. Move this part of the flame along the fitting and the pipe to bring them up to soldering temperature. Then concentrate the heat in the middle of the fitting. The light blue flame should be just touching the fitting. You can do both ends of the fitting at the same time by heating in the middle like this. You can experiment with different tips on your propane torch until you find the one that spreads the heat evenly along the pipe you are using.
Do not apply the heat directly to the area that has been fluxed, and don’t overheat the copper pipe. If you look at the flame on the side of the pipe away from the torch, you may notice a green flame develop. This means the fitting is ready to solder. Another way to tell is to touch the solder to the hot pipe. If the solder melts and begins to run, the pipe is at soldering temperature.
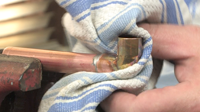
Apply the solder to the pipe where it joins the fitting. When performed correctly, the solder will flow easily into the fitting. Keep melting the solder until it appears completely around the fitting. The old saying, “If a little is good, then a lot is better,” does not apply here. Excess solder can run down inside the pipe, causing a restriction or even a blockage. After the solder melts, wipe away the excess with a shop towel and let the fitting cool thoroughly before touching it.
Well there you have it. Now you know how to sweat copper. In the next segment we’ll teach you how to work with plastic pipe and push fittings.
Close Transcript
very clear instructions
Thanks for the effort here….great video. I watched others and could not figure out how to do this….after watching your video I got it the first time…
New idea for me
Hope this helps
Outstanding do-it-yourself instructional video. I just repaired a copper pipe that needed five welds and had no leaks – truly amazing from my perspective – and I attribute it to the clear, thorough explanation in this video. Thanks.
Good instructional video. Good emphasis on not using to much solder. I found after a few test joins that if I had “boogers” on the outside of my joint, I likely had boogers on the inside as well, thereby negating all my effort to ream my cuts clean.
Really great job with this. Thorough without being long. Well narrated, succinct, and not wordy. The video is easy to see with the perfect zoom and no movement. I watch many DIY videos; this is the best I’ve seen. Thank you very much for publishing.
Great Instructions! One small omission: Step 5 mentions soldering paste but that item isn’t on your “tools” list. (I only recognized this because I was trying to find the correct term online, didn’t see it in the list but saw it in Step 5.)
Tip: sweat your fitting from the bottom moving UP. Heat rises; by sweating connections lower than the previous, you risk undoing the recently top soldered joints 🙂
There may be a reason to move bottom to top when sweating joints — an experienced plumber would know.
But no, heat does not rise. Hot air rises (and hot water — any hot fluid), because it is less dense than colder air. But heat transfer in a copper pipe will not move any more up than down (at least not significantly, there will be hot air moving up around and in the pipe). I suspect it makes no difference which way you go.
Great video, very clear! Thanks
5-4-2015 @ 6:30AM The video runs but sound stops about 1 minute into the 6 minute presentation. Can I do anything to fix it?
No matter how much I heat the copper pipe all my soldier wants to do is break off in pieces it will not melt in to the pipe like it should…….HELP I am extremely frustrated right now!!!!!!
Ha! I had the same problem today! I was over heating the pipe and aiming my flame where I was going to apply the solder. I backed the flame off a hair and applied the heat just below the joint and got it to work.
One of the copper pipes on my hot water heater is leaking and I’m going to try and fix it. I appreciate your instructions on how to solder. I’ve never done it before and if I hadn’t found your instructions I might have just called a plumber. If the pipe leaks at the joint after soldering do I need to take it all apart and redo it, or can I just re-solder it?
Saved as a favorite, I really like your blog!
Ahh. Thanks. I have a tendency to heat the pipe too much and the flux probably boiled off. I then was applying far too much solder where it was dripping all over and I would run out with the water shut off!
Thanks for including quality pictures with your instructions. I’m doing a renovation project of my bathroom, and I found a plumbing issue. It seems like this project keeps growing in complexity and cost. I think I’ll call a professional if I can’t get the pipe fittings to work.
I have been trying to fit 1/2″ copper pipe into 1/2″ copper fittings without any luck, just too tight. I’m using a tube cutter and wire brushes. I don’t think lm distorting the pipe with the cutter. Any tips or tricks?
Flare the end just a little, or make sure you have the inside of one reamed and the outside of the make side well cleaned and slightly tapered
Very helpful information and great presentation. Thank you!
Great video. I was always kind of intimidated by this particular D.I.Y project but after watching this video, I can’t for the life of me figure out why. Simple, to the point and very informative. I’m gonna give it a whirl tomorrow. 🙂
Thanks – San Jose, California
I really appreciate the insight here in this post and confident it’s going to be helpful to me and many others. Thanks for your useful post.