How to Sweat Copper Pipes and Fittings
If your home has copper plumbing, then you should know how to fix it if something needs repaired or if you’re running new lines to a fixture. Sweating copper isn’t that hard, and it’s kind of fun. Watch this tutorial video for the basics on how to sweat copper.
- Copper Pipe
- Copper Fittings
- Propane Torch / Propylene Torch
- Flux
- Flux Brush
- Lead-Free Solder
- Hacksaw
- Channel-Locking Pliers
- Sandpaper
- Tubing Cutters
- Pipe Reamer
- Wire-Fitting Brush
- Towel
- Vice

Cut the pipes to the right length using a hacksaw or a copper tube cutter.

Remove the burs with a wire brush or file.

Clean the end of the copper pipe with a special cleaning brush. Clean until the surface is bright all around.

Clean the inside of all fittings.

Apply soldering paste to the cleaned ends of the pipe and the insides of the cleaned fittings.

Attach the fitting to the end of the pipe and use a propane flame in the middle of the fitting to heat both ends at the same time. Don’t apply heat directly to fluxed area.
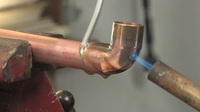
Still using the flame, solder the joints together. You only need a little bit around the whole circumference of the tube.
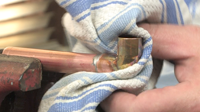
Wipe excess solder away with a rag.
Read Video Transcript
There will come a time in the course of a do-it-yourself plumbing project when you will need to connect copper water supply lines. Instead of calling a plumber to do the work, maybe it’s time to stretch your plumbing skills a little bit and lean how to do it yourself. It’s really pretty easy, and with the right tools and know-how from your local independent home improvement retailer, you’ll be sweating copper in no time.
Today I’m going to show you the basic method for sweating copper pipe. We’ll discuss how to cut copper pipe, we’ll talk about copper fittings, and how to solder these components together.
So let’s get started.
Copper pipe (or tubing as it is called) is joined together using copper fittings. There are a variety of fittings designed to make turns and bends in pipe, or to branch out in various directions. These are just a few of the types of fittings that are available in ¾” and ½” sizes.
We’ll start by learning how to cut copper tubing. To cut copper tubing, you can use either a hacksaw or a copper tube cutter designed specifically for this task. Although both will make a satisfactory cut, the tube cutter ensures a square cut every time and leaves fewer burs. When using a tube cutter, hold the copper tubing in place with a vise or a clamp, being careful not to distort the copper. This tube cutter uses a screw motion to tighten the cutting wheel against the pipe as it is turned. Several rotations and the piece is cut. This cutter is designed to work in tight areas where there isn’t room to spin the larger cutter. Having both on hand is a good idea.
After making the cut, we need to remove the burrs inside the pipe. A wire brush designed for this specific purpose makes easy work of it. If you cut copper pipe with a hacksaw, you may want to use a half-round file to perform this task, as the hacksaw leaves more burrs than the tubing cutter as you can see here.
When cutting pipe for a specific run, you’ll need to make allowances for how much the fittings increase the overall length of the run. While it depends on the fitting, a general rule of thumb is to add about a half inch for each fitting to the length of pipe you cut.
After you’ve cut the copper pipe to the proper length, clean the end of the pipe with this special cleaning brush. Clean the area to be inserted in the fitting until it is bright all around. Turn the tool back and forth until the pipe is bright. You can also use sandpaper or steel wool to accomplish this task.
You must also clean the inside of all fittings. You can use the wire brush, steel wool or sandpaper. Take the time to clean them thoroughly. Debris or foreign matter left in the pipe causes a poor seal.
Next, apply a light coat of flux or soldering paste to the cleaned end of the copper pipe. Use a flux brush to spread the flux. Flux or soldering paste ensures a firm bond between the copper and the solder and will help will keep the copper from oxidizing when heated. Also apply flux to the inside of the cleaned fittings using the same technique. Place the copper fitting on the pipe only after it is thoroughly cleaned and coated with soldering paste. When the fitting is firmly in place, rotate both the pipe and the fitting several times to spread the flux evenly.
A propane torch is the tool we’ll use to sweat copper pipe. If you look at the flame of torch you will notice there is a lighter blue, well-defined flame in the middle of a darker blue flame. The tip of this light blue flame is the hottest part of the flame. Move this part of the flame along the fitting and the pipe to bring them up to soldering temperature. Then concentrate the heat in the middle of the fitting. The light blue flame should be just touching the fitting. You can do both ends of the fitting at the same time by heating in the middle like this. You can experiment with different tips on your propane torch until you find the one that spreads the heat evenly along the pipe you are using.
Do not apply the heat directly to the area that has been fluxed, and don’t overheat the copper pipe. If you look at the flame on the side of the pipe away from the torch, you may notice a green flame develop. This means the fitting is ready to solder. Another way to tell is to touch the solder to the hot pipe. If the solder melts and begins to run, the pipe is at soldering temperature.
Apply the solder to the pipe where it joins the fitting. When performed correctly, the solder will flow easily into the fitting. Keep melting the solder until it appears completely around the fitting. The old saying, “If a little is good, then a lot is better,” does not apply here. Excess solder can run down inside the pipe, causing a restriction or even a blockage. After the solder melts, wipe away the excess with a shop towel and let the fitting cool thoroughly before touching it.
Well there you have it. Now you know how to sweat copper. In the next segment we’ll teach you how to work with plastic pipe and push fittings.
Close Transcript
For how long do you have to let it dry?
It is “dry” in seconds. Solder is molten metal and the paste is consumed by the process. Everything is ready as soon as the pipe cools.
How about if is a water line and still wet inside.
Take a pinch of loaf bread and ball it up so that it is the same size of the inside diameter of the pipe you are working with. Insert the bread ball into the pipe so that it will absord the moisture while you sweat the pipe. Bread ball will disintegrate when water is turned back on to your repaired pipe.
Great idea. 👍
Now my pipe is clogged and I have no heat. Screw you
J, you’re not supposed to use the whole loaf…and the bag it comes in. Good grief.
Yes just a pinch of soft bread but if ur sweatin radiant heat pipes I wouldn’t use the bread I would try an air house blow the water out and try to wipe out the pipe there usually 1/4 inch so it’s small but the air hoses with the extended wands work great
Hi,
Want more clients and customers?
We will help them find you by putting you on the 1st page on Google Guaranteed $99.
If you want get your Website Rank Top on Google then contact with us. WE will provide you better special offers for your Website.
If you would like more details about our SEO packages or would like to ask me anything regarding this matter then feels free to write me an email.
Thanks & Regards
Shailendra Kumar Shukla
Skype: snehadixit9
Cell & whats app : +91 9236546467
Online Marketing Manager
I couldn’t get a plumber to my house to save my life. I had agreed on a price with one… he didn’t show, AND he kept me waiting all day. I remember when tradesmen were men of honor. I haven’t found anything but criminals, and pieces of crap for years. Thank you for taking the mystery out of sweating a pipe. I now have every skill I need to never be forced to deal with one of the overwhelming majority of losers out there!
Same here! I’ve had to go behind and fix the “tradesman” work from carpentry, HVAC, plumbing, roofing and electric. Then they have the gall to be arrogant? They don’t show up, they don’t call and they don’t respect their customers. My HVAC guy just quit 20% thru the job changes his phone number and left with my deposit. I’m done with hiring out these crooks. I’ve learned a ton of skills I was afraid to learn and now I’m making better progress alone and it’s done RIGHT!
I’d like to see a demo of sweating a “tee”, or an “cross/exx” that does not loosen solder of previous sweats. I;m talking of a very small tee- 1/4 inch. The torch heat on one end of tee is immediatly all over the other ends of the tee. Is there an “order” of approach.ie lower one first, side next, top last ? etc.
I’m no expert, but you could cover the previously sweated fitting(s) with a cool, wet rag to prevent it from heating to the point where it loosens the bond. I did the same thing with a 90-degree elbow when installing a tub spout without incident. Certainly it was a diameter larger than a 1/4-inch tee, but still close quarters with a successful result.
Thank you!
Your instructions were first on google.
My shower valve broke today. First try was a an epic fail… shower at the soldered joints. Water sprayed everywhere.
Disassembled, used new pipe and followed your simple instructions
Cleaning properly, using Flux, and heating the joint not so much the pipe made all the difference. The solder Sucked right into the joint.
I suggest soldering the pipe to the fittings that thread onto the shower valve first. Fit the pipe together, with flux in place, Then sweating the others as so not to damage the new valve.
Might be wrong, but thanks just the same.
Also found the small bleeder valve (like a cap on the side of the valves) at each of the shut off valves helpful to get the water out of the lines, but I had to shut off whole house to drain those pipes.
Very happy to have been able to do it.
Pretty cool, thank you. Nice presentation. Helpful.
In-app downloader allows you to download faster while keeping it organized with it’s file manager.
Minimal app store design and very easy to use.
VIP provides access to limited collection, no ads, very less app revokes (unreleased).
I am also exploring the differences on the two issues, but the information is missing, thank you for sharing, kiss novel
Thanks… good refresher (last sweating job in my home was a long time ago).
This is one of the best “how to” videos I have ever came across. Simple, and to the point. I wish more instructional videos were like this one
Thanks for guideing for Sweat Copper Pipes and Fittings in you really explain and clear all dout realetd pipes fittings.
Thank you, that’s what I really need and looking for
Try out the best tiktok video downloader – https://qload.info
I;m also looking for copper piper fitting.
try our free and best tiktok video downloader
Try our free downloader
Okay thank you hhh
In-app downloader allows you to download faster while keeping it organized with it’s file manager.