


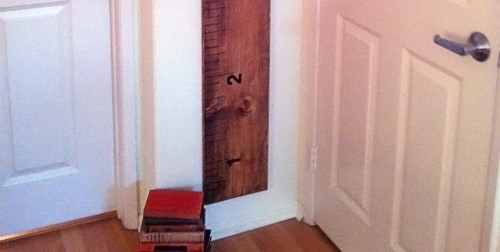
For Good Measure: A Vintage Ruler-Inspired Growth Chart
Posted by: Summer Baltzer
Find the perfect accessory… total excitement… look at the price tag… total disappointment. Does this describe any of your shopping experiences? This is often the case when I shop, so now one of my favorite games to play is, “How much can I make that for?!”
This happened recently while shopping for my son’s room. I came across an awesome growth chart inspired by an old wooden ruler and, being a huge fan of anything with a vintage feel, I had to have it However, the retailer was only willing to part with it for $69.99. Game on, retailer!
If you’re interested in paying only $20 in materials for a cool children’s growth chart that retails for just shy of $70, get ready to get your DIY game on.
Step One: Pick out the ruler style of choice. A quick search on the internet using the words “old wooden ruler” brought up tons of great ruler pictures that took me back to my childhood school days. I picked the design that was most meaningful to me to use as my model for my project.
Step Two: Get your materials together. For this project you’re going to need the following from your local hardware store: 1 Douglas fir board (1”x10”x6’), small can of stain, stain brush or rag, number stencils or a really steady hand, paint markers, tape measure, and a T-square. If you’re unable to get a T-square, don’t sweat it. We’ll deal with marking your board with a straight line in just few steps.

Step Three: Apply the stain. I wanted my black markings to be darker against the board so I chose to stain first. However, you could apply the stain as a last step over your black ruler markings for a more antiqued look. Either way, apply your stain evenly with a brush or rag over the entire board-face and sides, making sure to wipe off any excess or drips. I chose to use “golden oak” for my stain color, but you could go as light or dark as you wish. You can even choose a colored stain to match your room for a bright and fun look.

Step Four: Mark your board. Using your tape measure and a pencil, mark out your board in one inch increments, until you’ve gone the full length of the board. At this point, you only need a little hatch mark to see the proper spacing. If you don’t have a T-square, you will want to repeat this step on the bottom of the board as well. This will allow you to line up your ruler later on in order to keep your lines straight.

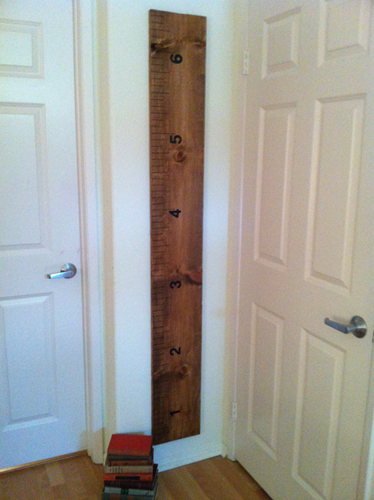
Step Five: Draw your lines. The might seem like a complicated step, but once you get going, it’s pretty simple. For your project to look closer to a real ruler you’ll want to make your line lengths different depending on what measurement line you’re drawing. For my project I choose to make my foot measurements 4 inches long. My quarter-foot measurements were 3 inches long, and the marks in between those were 2 inches long. Starting at the bottom of the board, this is the pattern I drew: 2”, 2”, 3”, 2”, 2”, 4”. The first 4” mark is where I counted 1-foot, keeping in mind that my growth chart will be hung 6 inches from the floor. Moving on from there the pattern was as follows: 2”, 2”, 3”, 2”, 2”, 3”, 2”, 2”, 3”, 2”, 2”, 4”. Keep repeating this pattern all the way up the board.

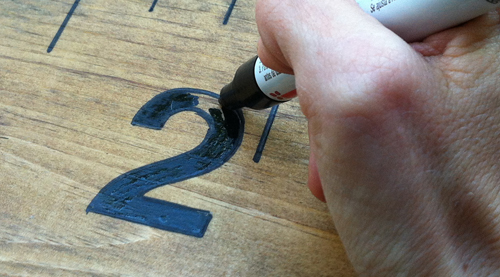
Step Six: Trace your numbers. For those of you with perfect penmanship and a steady hand, you can choose to draw or paint your numbers solo. I, however, need some stencil assistance. Next to each 4” line, place the corresponding number and trace it. This creates grooves in the wood to keep the paint inside the lines later on.

Step Seven: Painting your inch marks. Using the grooves created from your pencil marks, line up your T-square and start tracing your lines with your paint marker. Make sure that wipe your T-square every six inches or so to avoid paint build-up. If you don’t have a T-Square, this is where you’ll want to take advantage of those extra marks at the bottom of your board to line up your ruler. This will keep your lines nice and straight. Tip: If you’re right-handed, start at the right side of the board and move toward the left while you paint. If you’re left-handed, do the opposite. This will help to prevent your arm from accidentally smearing your hard work.

Step Eight: Trace your numbers. Using the grooves once again, trace your numbers onto your board. You can also choose to use your stencil for extra guidance as well. Just be mindful of the paint build-up on the stencil so you don’t smear it around.

Step Nine: Get to coloring: You’re almost there! Now that your numbers have been traced, you can start to fill them in. Again, tracing the numbers first, along with the grooves from your pencil marks, will help to keep the paint from bleeding and will give you a crisp and clean look.
Step Ten (Optional): Seal it in. To better protect your paint and stain, use some polyurethane to seal it in. I prefer a low sheen so that it’s easier to add marks to my board later. Too much gloss will make your future growth markings less permanent.
Step Eleven: You’re done! Pat yourself on the back. Hang your ruler-inspired growth chart on the wall and admire your handiwork!


It is very great that people can get to know about such information.
In this process we can find a best track and trick for the window so i want sync your settings share this site with all.
Keep the hard work on and to get a size for door and window now you can choose the online site to get it done and windowshades.net is providing best window shades for your home window and also now you can put shades outside at your door.
I recommend you to check https://fivebestvpn.com/ out if you want to learn more about the Best VPN Services. It will help you for sure
Every student can visit this website for academic assistance. I have been ordering papers here for a very long time and am always happy with the quality. It is worth your attention.
I’m in college now, and many of my friends and I, of course, struggle with writing tough essays. I recall how many hours I had to spend on it previously, and it was dreadful. But now that the situation has been resolved, I would like to thank those that assisted me essay writing help uk truly handled the issue. Now that I’ve forgotten about writing papers, I practice and work even though they are working for me =)
Hello everyone, If you’re looking for high-quality and natural skincare products, I highly recommend checking out Susanne Kaufmann’s line. Her products are made with the finest plant-based ingredients and are free of harmful chemicals. I recently tried the Moisturizing Mask and it left my skin feeling incredibly soft and hydrated. If you’re interested in trying out some of her products, you can find them at https://www.alyaka.com/collections/susanne-kaufmann. Trust me, your skin will thank you!