


Bookcase Makeover
Posted by: Amanda Bell

My husband and I could not have been more excited to move into our very first home earlier this summer. After living in his parents’ basement for the better part of a year while saving up for the down payment, we were excited to finally have our own place.
In the couple months between when we had our offer accepted to when we actually were allowed to move in, I spent many nights online ogling over budget-friendly decorating ideas and d-i-y project tutorials for our new home (after shelling over the down payment, our décor funds were pretty limited). Lucky for me—and my bank account—some of the furniture I was already living with in my in-laws’ basement was the right size and style for our new home.
Enter these two composite-wood bookcases. Functionally, they were in good shape; aesthetically, not so much. I had never much liked their dated look, but just knew with a fresh coat of paint, some new hardware and canvas-covered backing, they would fit in great with the casual, cozy style of our new living room.

So with my in-laws’ permission (Tip No. 1: Before repurposing relatives’ furniture, always check to make sure you’re not painting over a family heirloom), my husband and I headed to our local hardware store to gather the supplies needed for the first d-i-y project for our new home.
Supplies You’ll Need:
- Sandpaper (lower grit for stripping; medium grit for between coats; fine grit for finishing) and sanding block
- paint brushes
- wood filler
- high-hiding primer
- white paint
- polyurethane
- metallic spray paint
- wire brush
- 3 yards of canvas fabric
- heavy-duty staple gun and staples
We started the project by emptying the bookcases and clearing them of any dirt and dust, and then we took off all the drawers, shelves and hardware. To keep track of all these odds and ends through all the mess we created from emptying the shelves, we put them all in a plastic bag and set them aside.
Next, we sanded off the old finish, so the primer would have a rough surface to stick to, and filled in all the drawer holes with wood filler. After that dried, I gave that a light sanding, too.

I should note here that the next steps in this process—priming and painting—took us a couple weekends to complete. There were a lot of pieces to this bookcase: three shelves and sets of drawers, two drawer fronts and a drawer that opens and closes on a piano hinge and of course the two bookcases themselves. These pieces all had nice beveled and trim details (which I LOVE), but that also meant that it took a lot of cutting in to avoid leaving behind any brush strokes. I should also add here that I left off the most important item on our supply list: patience.
I happen to have a husband who is eager to learn all about home improvement projects, so the process took half as long as it would have taken if I had attempted this project alone. In total, I would estimate with both of us working (not including breaks), it took us two full weekend days to prime and paint both bookcases. I’d recommend finding a friend to help with a project as big as this because not only does it save time, it also makes it more fun.

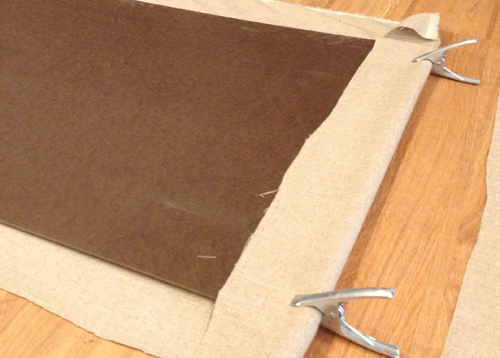
With the priming and painting out of the way, there were a couple more steps in completing this bookcase makeover. We had the local hardware store cut new backing to fit our pieces (the old ones were ripped in some places and had seen better days), and then, when we got home, we ironed some canvas fabric I had on hand before stapling it onto the back to complement the style of our new living room.
Once we did that, we drilled the holes for the new hardware and scrubbed the old hinges with Brass-O using a wire brush before spray-painting them oil-rubbed bronze to match the rest of the pulls and knobs.
After the polyurethane had dried, we reinstalled all the drawers and shelves (for an added touch, I lined the pull-out drawers with patterned contact paper, but this step is totally optional). All that’s left to do is fill it with books and décor we’ll buy throughout the process of decorating our new living room.


Thanks for sharing the informative information through the article
http://slotomaniacoins/ and all the details are awesome and good in this post thanks for sharing it.
I really like the way you decorate your bookcase, it looks simple but very harmonious.
I’ve always wanted to have a grand piano, but I never thought it was possible. Everything changed when I found the Steinway website and found a unique Steinway model M on it. Their choice is impressive, and the prices are surprisingly reasonable. I am very pleased with my purchase and encourage anyone interested in a piano to look at their website. I wish you a good day!
I want this kind of bookcase.