


Fun Framing with a Flexible Artwork Solution
Posted by: Summer Baltzer
When it comes to artwork, all of the old rules are out. Gone is the need to always match and carefully align frames. Now it’s all about mixing mediums, finishes, styles, and colors. This also means coming up with creative and flexible ways to display your artwork as well. If you’re like me and you like to rotate your look or change out your pieces, this solution will allow you to do that in just a few easy steps.
Here is what you’re going to need:
Picture frame
Featured artwork
Craft paint and brush
Wire
Measuring tape
Staple gun, screws, or “D-Straps”
Clothespins

Step 1 – Choosing the right frame
The size of your frame is going to be determined by the size of the artwork you’re looking to display. For instance, if your art is 8×10, try using a 10×12 or 11×14 frame so your piece has a little floating space. Recycle your old frames for this project, hit the flea markets, or buy something on clearance. This project does NOT need to break the bank!
Step 2 – Add a touch of paint
Whether you are starting off with a store-bought frame or a flea market find, it’s always nice to add a little personality to your project by personalizing it or adding colors to better reflect your interiors. Since my project is for my son’s artwork, I wanted to add a subtle accent color that would make his artwork pop. Feel free to spray out your frame in an entirely new color or just use a dry-brushing technique to highlight any interesting grooves or ornamentation in the frame.

Step 3 – Mark out your wires
Imagine that your artwork will be matted in the center of your frame, but instead of paper matting, you will have free space. The size of the space around your artwork will dictate where you want to place your wire. For my piece, I chose to mount my wire 2 inches below the frame’s inside edge so I would have about the equal amount of space on all sides.
Once you’ve figured out where you want your wire placed, turn your frame over and measure down to mark for your wire.


Step 4 – Installing the wire
Now that your wire placement is marked, it’s time to secure the wire. There are a few easy ways to accomplish this. The first is by using the pre-existing straps that your frame comes with. To make sure your wire is secure, you will want to loop your wire through at least twice before twisting it off. Stretch it tightly across the back of your frame and do the same to the other side.

Another method to secure your wire is by using the screws found in your standard picture hardware kit. Twist the screw until it bites into the wood. Once it’s in place, wrap your wire around and twist off. Then finish twisting your screw until it secures the wire in place. Repeat these steps for both sides of the frame.

The last method, and possibly the easiest, is to use your trusty staple gun. Lay your wire against your frame and staple in place. Then double your wire back over your staple and add an additional staple for security. This helps to keep your wire from pulling or slipping over time. To finish, just stretch your wire tight across the back of your frame and staple into place on the opposite side.


Step 5 – Adding your artwork
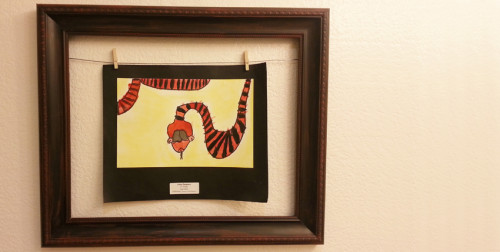
Now that your wire is secure, it’s time to hang the frame on your wall and add your artwork, using a few simple clips or clothespins. Using the pins allows you to swap out and display artwork as your mood changes, or in my case, or as your children bring home more pieces!


Hello guys this is a awesome place i found a lot of informative information here click this link dvd player windows 10 download is online video software thanks for sharing it.
PrepaidCardStatus
I ordered a paper from this company after reading some grademiners reddit reviews and they completed on two of the questions I paid for. I requested a refund and they only offered 50%. When I asked why they lied and said I didn’t send the entire paper.
It’s not uncommon for software developers or others not to care about customers. Therefore, before contacting such people, it is necessary to check all information about them. It will be more reliable that way.
So you should never be in a hurry to go to the first company you see. You should first find out all the information and read the reviews about the company. At https://yellow.systems/blog/how-to-build-a-podcast-app, you can learn about creating a podcast app. Perhaps someone will find this information helpful.
If you are looking for a reliable and efficient solution for importing goods to your online store, use the magento 2 import product images import tool from Amasty. I used it and was amazed by the simplicity and speed of the import. It helped me to save a lot of time and effort! Therefore, if you need it too, I recommend you to try it!
I love musical art. Therefore, I am a big fan of YouTube music videos, because there are many talents who write and sing beautiful lyrical songs. About a month ago I discovered YouTube Mp3 Converter and now I started listening to music from YouTube even more often. So I look for the most cool songs and then convert it to mp3 format to listen to on a smartphone. All my friends started wondering where I got such a cool playlist of lyrical music.