


Fixing Up a Desk With a New Coat of Paint
Posted by: Liz Lichtenberger

A friend of ours gave us a desk that sits in the corner of our family room. It’s a great place to drop the mail or write a quick note. While it’s the perfect size and made of solid wood, it’s older and has some dings and scratches. I thought a coat of paint would be a good way to spruce it up.
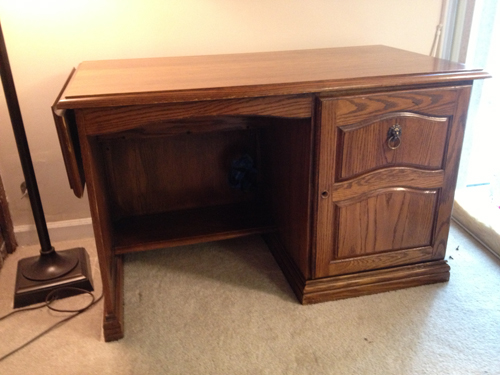
I chose to paint it black because it was a good neutral color, and, more importantly, it matched the color of the chair that we use at that desk. I also wanted to get a piece of wood to put on the top shelf so that it would hold more (before, it only gave us about half as much storage as the bottom shelf).

What you will need:
- Sanding block or sandpaper
- Power sander (optional)
- Plastic dropcloth
- Plywood (cut to fit the shelf)
- Liquid Nails
- Finishing nails
- Primer
- Paint
- Paintbrushes
- Paint roller (optional)
- Polyurethane
- Hardware (if you aren’t resuing the old hardware)
I stopped at my local store for a piece of plywood, which they cut to the size I needed for the shelf. I also picked up some Liquid Nails and a new cabinet pull. I already had everything else I needed at home, making this a fairly inexpensive project.
We moved the desk out to the garage and put it on a plastic dropcloth. I used the power sander to sand the flat surfaces, which was quick and easy to do, and the sanding block and a small piece of sandpaper to go over the edges and get in the corners and around the decorative parts, which took a little longer.

Once it was sanded, I dusted it off and wiped it down with a damp cloth to make sure I’d gotten rid of any dust. I then sanded the edges of the plywood I’d bought before attaching it to the top shelf. I glued it on with Liquid Nails and added a few finishing nails around the edges. Then I sanded the top of the plywood down and cleaned it off.
Next, it was time to paint. I primed it first, then added three (yep, three) coats of black paint. I used a small roller for the top and sides and a brush for the inside of the cabinets, the edges and the decorative parts. Once each coat was dry, I sanded again before painting the next coat.
After the paint had dried, I put a thin coat of polyurethane on the top of the desk and the front and inside of the cabinet. I figured these were the parts that would be most commonly used or touched (like when I open the cabinet door or pull out the shelves), so it was most likely to need that extra coat. I didn’t worry about adding poly to the back or sides.
Once the desk was dry, we moved it back inside. We still need to attach the new cabinet pull and reattach the decorative piece on the front, but the desk looks great with its matching chair.


I like how you transformed your old desk into a new and stylish one with a coat of paint. You did a great job of explaining the steps and showing the photos of your process. The black color looks very sleek and elegant, and it matches the chair perfectly.
Roofing Services in Fort Worth TX