


Enchanted Princess Forest Part 2: Designing a Fairy-Sized Tree Fort
Posted by: Sharron Wright

When our 8-year-old daughter put a fairy-sized forest play set at the top of her Christmas wish list, I knew we had to find a way to make her dream come true. Fortunately for our little nature lover, we had all the tools and materials at home to build this heirloom toy.
My husband, Scott, explains how he used a maple branch pulled out of our back yard and birch plywood to construct the layers and furniture in the companion post: Enchanted Princess Forest: Building a Fairy-sized Tree Fort.
The most important part of the design was to keep the scale in perspective. She has some favorite dolls that I knew would be perfect for this landscape, so I gathered them up before designing all the vignettes. It may help to read the descriptions a few times, then study the photos to see all the details.
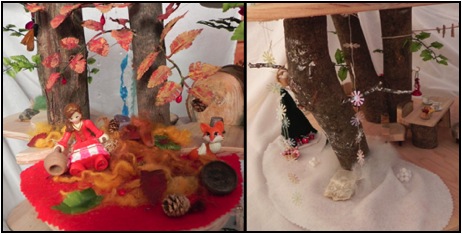
Trees: To make the trees look realistic, I found some fake greenery that was just the right size, pulled the stems apart and drilled small holes in the maple support posts. With a little construction adhesive on the stem, they are now able to withstand a lot of play time. For the fall scene, I painted the leaves gold and red and glued a few on the ground. For the winter scene, I drilled holes to insert bare twigs, then painted snowy highlights. The tiny evergreen trees are just green felt triangles sewn together.

Swing: We used a large shaker peg to hold the tree swing, made of wood scraps and twine. I didn’t have the patience for glue, so Scott nailed the swing seat and back together with his brad nailer. We drilled holes for the twine, and tied the swing under the peg to tiny eyelet screws.
Waterfall: I love this part. I used blue and white ribbons and some iridescent beads on a wire to depict the water. I think the ruffled edges really made this look like flowing water. I attached all this to the top with a self-adhesive hook and loop fastener so we can take it off if it’s in the way, or when the cat finally destroys it, I can easily replace this one. The rocks were adhered with construction adhesive (don’t use hot glue; it’s not strong enough). And the coolest part is the geode cave. We found this geode on a hike with our girls and it gave our waterfall a sparkly origination point.
Toadstools: Small wooden shaker pegs were inserted into predrilled holes on this ledge. We had a slight blowout, so fewer pegs spaced farther apart would be advised. But, with some red and green paint and dark green wool as the mossy ground, there is no way to tell we had a problem.

Fireplace: This was Scott’s masterpiece and solved the problem of incorporating some sort of stove or fire source. I made the fire using twigs and a really fortunate mass of gnarly wool that happened to look like a flame. Scott used some sort of power tool (I wrote that to make him crazy) and glued in tiny river rocks. I have no idea how he made the chairs. I believe it involved a rotary sanding bit and a drill. We were pretty sleep-deprived by this point.
Zip Line: I have to admit, this is my favorite feature. The zip line actually works. Each doll can hold on and zip her way down to next level under the waterfall. I found the metal rings in my daughter’s jewelry-making kit.
Ladders: The two ladders are simply twine and fluted dowel pins held together with hot glue. The stair steps are small circles of maple branches secured with construction adhesive.

Watch Tower: We needed to cap off the top post, and I had already used two bird nests. Scott came up with the watchtower design using 2-inch white aluminum nails and some decorative wire. He nailed them in about half an inch apart, then wove the paper-wrapped wire back and forth until a cool little balcony rail formed. It’s accessible by way of steps made from slices of maple branch glued together to form a spiral staircase.

I’m sure there are more details I’ve left out. We spent countless hours on this project after putting the girls to bed each night. We’re already starting our second enchanted forest for our youngest daughter who wasted no time in requesting her own!
If you have a question about a specific detail, leave a comment so I can help you out.


Delete window setting improve your work related to websites the main purpose it to view the history of web pages and so on delete history internet using this you become perfect in your work and just forget all the trouble.
Thanks for this content on the blog.
If you are searching for academic help, look at this site. This service offers the most affordable prices for any paper and can handle any task. You should try it!
My little princess will love this garden much. It looks so amazed mapquest driving directions app
oyun üçün keyfiyyətli bir sayt axtaran hər kəsə. Sizə sadəcə ideal bir yerdə oyuna başlamaq üçün tövsiyə edilmiş yeri tapdım, burada kumarxana saytında unudulmaz azart oyunlarının bütün lüksündən zövq almaq mümkündür – https://melbetaz.app/casino/ . Bu saytın böyük potensialı üçün minnətdaram! Dostlar, xoşbəxtliklər! Bu saytda böyük qazanclardan çox arzulayıram!