


Painting the Kitchen Cabinets—Part 2
Posted by: Liz Lichtenberger
In Part 1, I told about how my husband, David, and I prepped our cabinets for painting.
Next, it was time to pick out the primer and paint.
We shopped around a little for a primer but ultimately settled on a multi-purpose one that actually worked on stained wood without sanding, as well as laminate and other similar surfaces. We figured this was a safe bet, just in case we had missed any spots while sanding and because we weren’t really able to sand the laminate portion in the kitchen. We also liked that it was low-VOC (meaning fewer chemicals and less of an odor).
For the paint, we decided on a semi-gloss finish, so that the cabinets would be easy to wipe down. We chose a water-based paint recommended specially for cabinets. It, too, was low-VOC, and it didn’t require a coat of polyurethane on top to seal it in.
We probably could’ve used the off-the-shelf white color, but David’s sister and her husband had just painted their cabinets with the same paint, using a slightly different shade of white, and we liked the way those turned out, so we decided to use the same white they’d used. (I’d also heard that some whites can be too bright, some can have pink or beige undertones, etc., so we figured it was safest to go with something we knew we’d like.)
As with the sanding, we did the priming and painting in the garage. We had some old 2x4s (left by the previous homeowner) that we nailed some nails into and set, nail side up, on the garage floor on top of the plastic drop cloth. This way, we could set the doors and drawers on the raised surface to easily paint the edges without running the risk of getting paint everywhere.
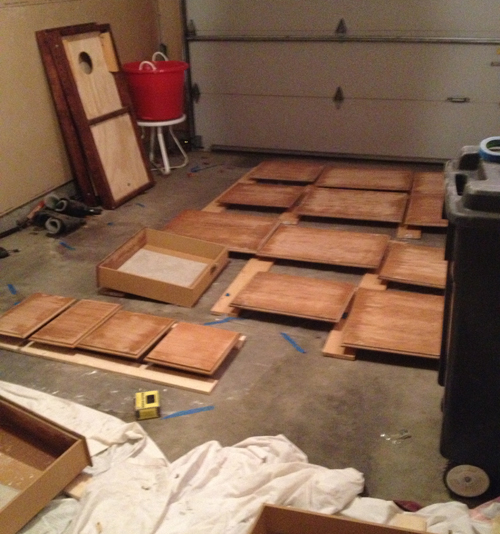
We used small rollers for the surfaces and a 2-inch angled brush for the edges.
Our cabinets were flat in front, but if yours have any sort of decorative design, you may have to use a brush for those parts and then go over the flat parts with a roller for a smooth, even finish without the risk of brush marks.
David used the small roller to apply primer, while I painted the edges with the paint brush. We did the backs of the cabinet doors first, so that if we accidentally left nail marks by flipping the doors over before they were dry, those marks would be on the insides of the doors rather than the outsides. We also painted the insides and outsides of the drawer fronts (leaving the insides of the drawers the same wood color).


After the primer dried, we applied a second coat. The wood we were painting over had a very visible grain, so we thought a second coat of primer might help better hide the grain. (We read the instructions on the can to see how long the first coat needed to dry before the second coat could be applied.)
While everything was drying in the garage, we headed inside to prime the cabinet framing. David used the small roller where he could, and I primed the rest with an angled paint brush. We used two coats in here as well.

After priming came painting. We ended up doing three coats of paint on everything. We tried to use the roller as much as possible instead of the paintbrush, just to avoid brush strokes. I held the cabinet doors and drawers (carefully) while David painted the edges with the roller. Then I set each one (carefully) back on the nails, and he used the roller to paint the main surface. As with the primer, we read the instructions on the can to see how long we needed to let the paint dry.
While everything was drying in the garage, we headed inside to paint the frames.

Once everything had dried, we hung the doors with the new hinges and added all the new hardware. Now, our kitchen cabinets look great!


I want to share this informational post because this is most using if you are using windows 10 operating system uninstall a program in windows 10 this will guide you with every step where to go for uninstalling a program from your computer system permanently.
For the paint, we decided on a semi-gloss finish, so that the cabinets would be easy to wipe down. We chose a water-based paint recommended specially for cabinets. It, too, was low-VOC, and it didn’t require a coat of polyurethane on top to seal it in.
cool mate. thanks
Here the reconstruction suggestions are quite supportive and wise as well. There should be the people who might want the suggestions about improvement of their kitchen. I’m sure those online mycvconsultant.com.au review suggestions are recommended please continue sharing such help always.
Great post! I’m currently writing an essay that requires a Toulmin model essay outline and this article was very helpful in guiding me through the process. Thank you for sharing your expertise!
Great post! I’m currently writing an essay that requires a Myjdfaccount and this article was very helpful in guiding me through the process. Thank you for sharing your expertise!
Unlock your entrepreneurial journey with londonlovesbusiness.com/trending-startup-ideas-for-students-in-london/ trending startup ideas for students in London! This resource is a goldmine for aspiring student entrepreneurs, providing a curated collection of innovative ideas tailored to the dynamic landscape of London’s business scene. Explore now and ignite your startup dreams!
MyJDFAccount is a manufacturer of heavy equipment, gearboxes (gearboxes, axles, gearboxes) for lawn care equipment, construction machinery, and diesel engines for forestry and agriculture. https://myjdfaccount.shop/