


Tiling the Kitchen Floor
Posted by: Liz Lichtenberger

I recently shared how we removed our old kitchen flooring. Now I’m back to talk about the new flooring we installed.
We chose a neutral beige ceramic tile. For the grout, we just picked the closest color. Some people choose to go with a contrasting grout color, but we wanted everything to blend well.

My husband, David, and I knew this would be a big project (for us, at least), so we brought in some extra help: my parents. My dad is really handy, and the two of them worked together to remodel their kitchen a few years ago. They’d tiled their own floors, so they had the firsthand experience we felt we needed.
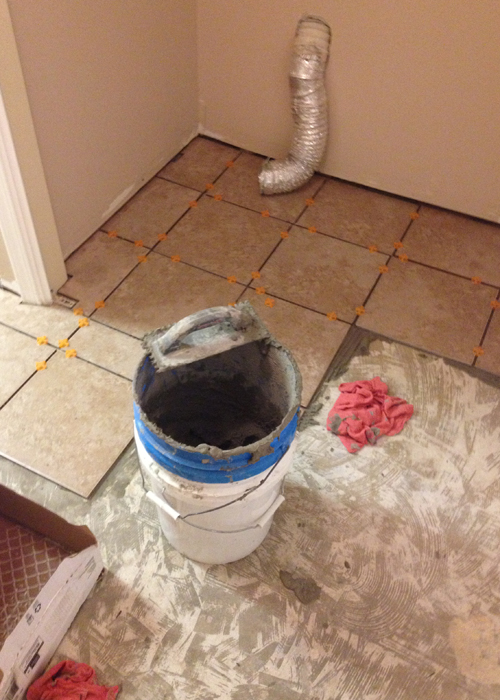
We used a shop vac to thoroughly clean the last bits of dirt and dust for the floor before beginning. The first step was to lay the tile. We laid it out on the floor just to get an idea of where to start. It’s generally recommended that you start in the center and go from there in order to use as many full pieces as possible. Once we’d decided how we wanted to do it, we snapped a chalk line and then got to work mixing the thinset (just following the directions on the package).
David used the trowel to apply thinset to the floor and then laid the tile on top, using our ¼-inch spacers to make sure it was evenly spaced out. Once he had each tile in place, he pressed it firmly down on to the concrete. (Note: Depending on your subfloor, you may need to apply concrete board or backerboard first. With our concrete slab, we were able to lay the tile directly on the concrete.)

My dad, meanwhile, had the wet saw set up in the garage, and he measured the edges and cut pieces of tile to fit before handing them off to David.
My mom and I helped by wiping up extra thinset between or on top of the tiles. It really didn’t take four people to do all the work, though, and my mom even found some time to work in our yard, doing some weeding and trimming the shrubs. We also painted the baseboards that would go back in the kitchen, bathroom and laundry room.
My dad and David got off to a good start with the tiling, and by lunchtime we were feeling pretty confident that they’d be finished in a few hours.
But things slowed down after lunch, mainly because, at that point, they’d reached the half bathroom and laundry room, which were smaller rooms with lots of special cuts that needed to be made. That slowed the process considerably.
At the end of a very long (15-hour) day, the tile was complete.

Here’s a photo of David laying the last piece:

The thinset needed about 12 hours to dry. This worked out well for us—we got a good night’s sleep and got a few things done the following morning before it was time to grout.
We used sanded grout, which is what the hardware store employee recommended (unsanded grout might be used for a backsplash, where the spaces between tiles are smaller). We also, at his recommendation, purchased a grout sealer. By using a grout sealer, we wouldn’t have to go back and seal the grout later—it would be taken care of since the sealer was already mixed in with the grout.
My dad and I started the grouting process, working side by side in the kitchen. You simply use a float to apply the grout to the spaces between the tile. It’s messy, and grout gets all over the tile, but that’s OK—your main concern is making sure you completely fill in all the spaces with grout.

After we let the grout sit for 30 minutes (check the label on the grout to see how long the manufacturer recommends you let it sit), we went back and used a bucket of water and large sponges to smooth the grout lines and clean the grout off the tile. It takes a while because the water gets dirty pretty quickly with all the grout you’re cleaning up, so you have to constantly change out the water.
Here you can see the difference the water makes. The tile in the top of the photo has been cleaned off. The tile at the bottom hasn’t.

The tiles usually cloud up after they’re cleaned off—this is normal. The best way to get that haze off is to just keep cleaning them with water. (I think there’s also a product you can use to clean the tile that removes the haze faster, but we chose to just use water.)

I think we cleaned them three or four times that day, and then we cleaned them once a day for the next four or five days, just to be safe—but really, the tile was completely cleared up just a day or two later.

We tiled the laundry room, too:

This was another long day. The next day, thankfully, was much shorter. After everything dried overnight, we just had to put the appliances back in place.
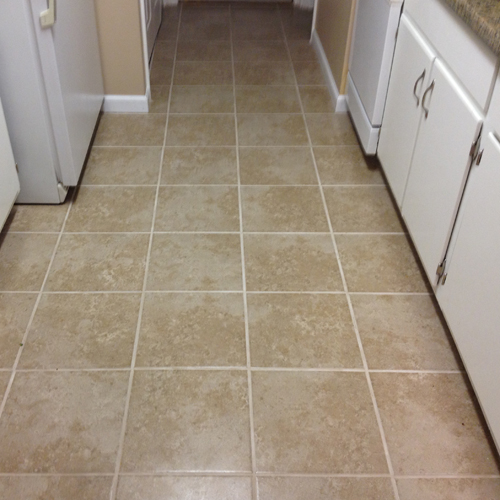
Now, we have a brand-new floor in our kitchen (which complements the new paint on the walls and cabinets and new countertop)! We’re thrilled with the results and very thankful my parents were willing to help.


David and I found out that tiling isn’t nearly as intimidating as we’d expected, and we’ve already started planning the next project (and last step in our kitchen renovation)—tiling the backsplash!


wow they done all that tiling in one day and still done a great job of it too. Brilliant!
If you are searching for secure web browser then you have to pay attention to this extra ordinary search engine.People are mozilla firefox browser download using this most and feel more protective here.Thank you so much for this.
Do you happen to know name of this tile or have the serial number?
If any of you need tile removal or tile installation services, then feel free to contact moderntiling, learn more about the services they provide. I have never in my life been able to find such responsible workers who will exceed all my expectations. I am very happy with the way they tiled my patio and also helped me with my kitchen baseboards.
Suur pöidlaid üles sellele saidile oma suurepärase koostamise online kasiinod eestis . Saidi põhjalikud ülevaated, ekspertide teadmised ja regulaarselt ajakohastatud teave on teinud minu Eesti online-kasiinode uurimise nauditavaks ja stressivabaks. Oluliste üksikasjade, näiteks makseviiside ja mängude mitmekesisuse lisamine tagab hästi informeeritud mängukogemuse.
Tražite zabavan način za opuštanje i mogućnost zarade? Ne tražite dalje od online kasina u Hrvatskoj. Nudeći savršenu kombinaciju zabave i potencijalnog profita, ovi platforme omogućuju vam da se opustite dok pokušavate svoju sreću. Među njima se ističe vavada –
https://slotsmegacasino.com/hr/casino/55-vavada.html kao vrhunski izbor za uživanje i unosne prilike. Zašto ne iskoristiti priliku, opustiti se i vidjeti gdje vas sreća vodi?