


Have Some Halloween Fun with Jack-O-Lantern Jars
Posted by: Summer Baltzer

With Halloween just around the corner, now is the time to adorn your home with festive and spooky decor! Feeling short on fun and whimsical elements to help set the stage? No worries; I’ve got you covered. Here is an easy no-carve jack-o-lantern project that anyone in your family can pull off—and all for less than $15!
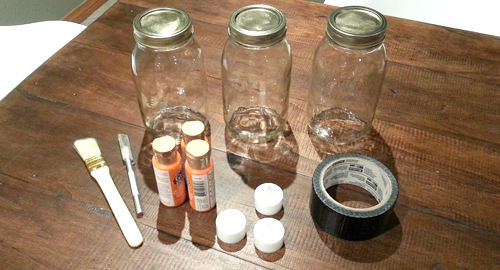
Here is what you’re going to need:
- Mason jars (size and quantity is up to you)
- Orange glass paint
- Black duct tape
- Craft blade or scissors
- Flameless candles
Step One: Painting your jars
The option to paint either the inside or outside of your jar is completely your choice. I personally find that it’s easier to avoid fingerprints and other blemishes when you stick to painting the inside. To do that, your first step is to squirt your paint inside the jar.

Step Two: Swirl it Around
Once the paint is inside your jar, begin to move the paint around by tipping your jar in various directions. By doing this you, are giving your jar a solid and even coat with minimal streaks. If you’re looking to achieve a painterly or homemade look, use a paint brush to spread the paint around on the inside the jar. Once you’ve covered the inside of your jar, put it off to the side to dry.


Step Three: Creating the Face
While your jar is off to the side drying, it’s time to create the face of your jack-o-lantern. Begin by applying the tape to the surface of your jar or to a non-stick area where you can easily peel your shapes up. I chose to use the back of a plastic placemat for my project.
Once your tape is in place, begin to cut out the shapes of your pumpkin’s face. I chose to do some traditional faces, but this is where you can get super creative and have some fun. And, the best part is your shapes don’t have to be perfect! I chose to use a craft blade to cut out my shapes, but you can also use regular craft scissors. This is also a great project to do with the family. Just give each member a jar of their own to decorate!


Step Four: Applying your Face
Carefully peel your shapes up and apply them to your mason jars. Because you’re using duct tape, you have the freedom to move around your face until you find the right placement. And, if worse comes to worse and you just aren’t happy, go back to the drawing board and cut out some different shapes.

Step Five: Adding the Candle
Your final step is to add a candle to the inside of your jar to give your jack-o-lantern that traditional Halloween glow. Since there is paint on the inside of the jar, it’s a safer option to use a flameless candle. Not only will this option save you from a melted candle mess on the inside of your jar, it will save you from a fire hazard in case your jar happens to fall or break.

Now that you’re finished creating your no-carve jack-o-lantern, it’s time to sit back and bask in the glow of your handiwork!


Whenever i Browse something in any of the web Browser am always looking to after use clear the Search records.If i face any problem then this online tutorial helps delete browsing history delete me a lot to learn and step by step processing.Thank you.
You should definitely check https://vpn-lab.com/tunnelbear-review/ out if you want to read TunnelBear review. It will be useful for all Internet users
I will use this guide next time. And you can check this https://resume-chief.com/blog/resume-format site now. You will find some info on resume format writing there.
I think this is a great idea for adding some fun and whimsy to your home decor for Halloween. You can make different faces and sizes of jars to create a variety of jack-o-lanterns. You can also use them as centerpieces, mantel decorations, or porch lights.
Best Handyman Services in Peoria IL