How to Replace A Kitchen Sink
A new sink can brighten up the work area in your kitchen, and it’s a good project to do in conjunction with a faucet replacement. Here, we’ll show you how to install a basic, self-rimming, surface mount stainless steel sink. This project requires some moderate do-it-yourself skills, but it can be completed in an afternoon.
- New Kitchen Sink
- Bucket
- Screwdriver
- Adjustable Wrench
- Channel-Locking Pliers
- Silicone Caulk
- Caulk Gun
- Putty Knife
- Replacement Sink Strainer
- Plumber's Putty
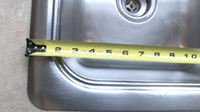
Measure your sink to to ensure the new one you buy will fit.

Turn off the hot and cold water shut-off valves. These are usually located in the cabinet directly under the sink.

Open up the faucet to relieve the pressure.

Disconnect the water supply line and remove the faucet, handles and the soap dispenser if there is one.
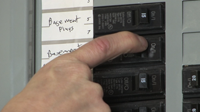
Turn off the power running to the garbage disposal and remove it.

Remove the slip nut and gasket connecting the drain assembly to the floor pipe.
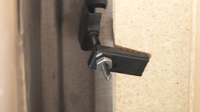
Under the sink, loosen the clamp holding the sink in place and turn to the side.

Use a box knife to score along the sink to separate it from any caulking.

Carefully lift out the old sink.

Gently remove leftover caulk without scraping the counter and clean the surface.

Add new caulk to the underside edge of the new sink.

Carefully place the new sink into the hole.

Smooth out caulk that seeps out from the sides.
Reattach any clamps that hold the sink to the counter.
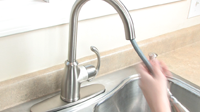
Place the faucet back and reattach the tubing.

Place plumber’s putty around the new drain and strainer.

Place the drain and strainer in their respective holes and tighten with the washer and nut that came with the assembly.

Remove excess plumber’s putty.

Reattach the garbage disposal.
Turn the power back on and test the sink. Make sure there are no leaks.
Read Video Transcript
A new sink can brighten up the work area in the kitchen, and it’s a a good project to do in conjunction with a faucet replacement. The project requires some moderate do-it-yourself skills, but it can be completed in an afternoon.
Here, I’ll show you how to install a basic, self-rimming, surface mount stainless steel sink. As you get started in this project, you can find all of the tools, as well as the advice you’ll need, at your local independent home improvement retailer. To avoid having to cut a larger sized hold in your counter, make sure the new sink is the same size as the old sink. If you’re also installing a new faucet, be sure to see our video “Replacing a Faucet.”
First, we’ll remove the old sink. Turn off the water by turning off the shut-off valves under the sink, and opening up the faucet to relieve the water pressure.
Next disconnect the water supply lines at the shut-off valves and remove anything else connected to the sink, such as the faucet and garbage disposer.
To disconnect the drain and gasket, remove the slip nut and gasket that attaches the drain assembly to the drain that comes out of the floor and also the tailpiece coming from the sink.
The next task is to take out the sink. Underneath the rim of the sink are clamps with screws that hold the sink in place. Loosen the clamp and twist them to the side.
You’ll also need to score underneath the rim of the sink with a blade knife to free it from any caulk or adhesive.
Carefully lift out the old sink. You may need some help with this step of the project. There will likely be caulk along the edge. Be sure to clean this off with a putty knife, but be careful not to scratch the countertop. When the sink is removed, remove all of the old caulk so that the edge around the hole where the sink will go is clean.
Now turn the sink upside down and run a bead of silicone caulk around the outer edge of the sink. Carefully turn the sink over and place it in the hole. Some of the caulk should seep out the edge between the sink and the countertop. Wipe this clean with a rag.
Underneath the sink, attach the clamps or any other hardware that may have come with the sink.
Once the sink is securely in place, finish installing the faucet by reattaching the supply lines to where they hook up to the shut-off valves.
Next, hook up the sink strainer. Since you’re installing a new sink, you might also want a new strainer assembly. To do this, roll a bead of plumber’s putty to a medium sized bead and press it around the edge of the drain assembly flange.
Drop in the sink strainer, then tighten using the washers and nut provided with the assembly. Trim away any plumber’s putty that squeezes out.
Attach the garbage disposer flange in the same way, if you have one. Finish installing the garbage disposer and reconnect the electricity.
With strainer assembly in place, attach the tailpiece then attach the rest of the drain assembly, including the trap. Tighten all connections and link them into the garbage disposer, if you have one.
Now you’re ready to test it. Turn on the water to the faucet, and run the water in each sink to make sure all of the drain connections are sealed properly. It’s also a good idea to check back frequently the first few hours after installation to make sure nothing is leaking.
If you have questions about this or any other home improvement project, be sure to read our list of Frequently Asked Questions for this video. And be sure to print out our Project Instructions, which includes a Tools and Materials checklist, before visiting your local independent home improvement retailer. That’s where you’ll find all the products and helpful advice to complete your project. If you’re not sure where to find your local store, check out our Store Locator.
Good luck with your project and thanks for watching!

Seminars, therefore, are a great indicator of the size and quality of your marketing platform. If hundreds of people attend your free or low-cost seminar, you can conclude that your platform is large. If, however, hundreds of people pay, say, $400 or more to attend your seminar you will know not only that your platform is quite large but also that your gravity well has drawn in a significant number of people.
Thanks for tips.
Every single detail about the topic has been highlighted in this article. You don’t come across articles like this very often. But when you do, make sure you comment.Condominios en Curridabat
I enjoyed read over your blog post. Your blog have nice information, I got good ideas from this amazing blog. I am always searching this type of blog post. I hope I will see again.roofers
I purchased and mostly installed a replacement kitchen sink. The flexible tubes in the box don’t reach and attach as they should. Is there something I’m missing.
If the water line fittings are near the floor longer replacement flexible hoses may be needed. Most are halfway between the sink and the floor. But that isnt how it always goes…
A very interesting topic that I have considered, I think this is one of the most important information for me. And I’m glad to read your article. Thanks for sharing!
Glad to know about it.
This topic is very interesting and I am interested but do not know where to find, thankfully you create this topic, hope everyone will help me
Very nice blog, we are from Kaam Ke Bande company, We provide Home services and Consumer services in Dehradun uttarakhand. Here is our link https://kaamkebande.com/plumber-in-dehradun/. please you can check out.
This is truly an practical and pleasant information for all. Thanks for sharing this to us and more power
Such a wonderful information blog post on this topic
Such a wonderful information blog post on this topic home for sale rochester
I’ve been searching for some decent stuff on the subject and haven´t had any luck up until this point, You just got a new biggest fan! lehigh valley real estate expert
thanks for this usefull article, waiting for this article like this again. home for sale buffalo
I needed to leave a little remark to help you and wish you a decent continuation.
house cleaning
I dont usually visit pages but i was happy to find this one.
move out cleaning service phoenix
I always struggle with what to say but this helps.
Very important! Thanks for sharing these information. Auto Glass Guy replaces
This is great now I don’t have to pay for this myself, I can install one in my Autocare shop
Thank for this great Article for me! if you want to more like this blog article click here
Toilet Blockage Removal