Installing an Electrical Outlet
Changing an electrical outlet/receptacle may seem intimidating, but it’s an easy project, as long as you follow the proper procedures for working with electrical wiring. Watch this video to learn how to do this project, and start building your skills for working with electricity.
**WARNING**
If you’re unsure about working with electricity, you should call a licensed electrician to do the work. But if you’re ready to give it a try, let’s go ahead and get started.
- Slotted Screwdriver
- Phillips Tip Screwdriver
- Replacement Receptacle / Outlet
- Needle-Nose Pliers
- Wire Stripper
- Work Light
- Voltage Tester
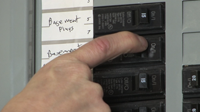
Find the breaker or fuse that shuts off the circuit that you will be working on. Make sure it’s in the off position.

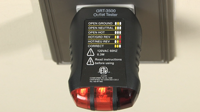
Double check the power is off using a voltage tester near the receptacle to check for an electric current.

Take off the plate by removing the two screws that secure it to the light switch. Use an alternative light source if you can’t see what you’re doing.

Remove the screws holding the receptacle to the electrical box in the wall.
Pull the switch out of the box. Remember the way the existing switch is wired. Take a picture or write down if needed.

Remove the old wires.

Reconnect the wires in the exact configuration they were before. Wrap 1/2-inch of uncovered wire around the screw and tighten.

Carefully push the receptacle back into the box and secure it with screws.

Screw the plate back on.
Turn the power back on and test the connection.
Read Video Transcript
In the first video on running electrical wire and cable through the wall, we ran wires up to a spot directly behind where our flat-panel TV is mounted. In this video, we’ll finish the job by installing an electrical box and receptacles where we can plug in our TV wires so they’re hidden from view.
Today I’ll show you how to install the new electrical boxes and hook up the wires that we ran through the wall to the new receptacle we installed behind the TV. We’ll talk about some of the different types of electrical boxes and TV component receptacles. Then we’ll finish by repairing our drywall and repainting.
Again, if you have any hesitation about working with electricity and hooking up electrical wiring components, call a licensed electrician to do the work. But if you’re ready, to tackle this project, then let’s get started.
When selecting a new electrical box for your project, you have several options to choose from. The first is deciding between a metal or plastic box. Our existing box was metal, but we’re opting to replace it with a plastic box, which meets code when running non-metallic sheathed cable, which is what we’re doing. We’ll also be using a box designed for “Old Work,” which refers to existing wall installations, as opposed to new construction applications. Old Work boxes have these “ears” that flip out and clamp to the back of the drywall when tightened. New work boxes like this one are fastened to a wall stud with these supplied nails or they can be screwed to the stud face through this metal bracket. For more information on selecting the right electrical box, see our frequently asked questions for this video.
After removing the old outlet and single gang box, we’ll prepare to install the new double gang box by placing it over one side of the existing cutout and tracing the perimeter of the rest of the box on the wall. Then, enlarge the hole using a drywall saw. Fish the two new wires through the wall to the opening. Before installing the new box, first punch through the knockout tabs on the back of the box using a hammer and screwdriver. This is where the electrical cables will enter the box. It’s also a good idea to place this plastic divider in the center grooves of the box to help shield our HDMI and coaxial cable from the electrical line voltage cable. This will help prevent electromagnetic interference with the signal.
On the low voltage side of the box, we’ll hook up our coax cable and HDMI cords to the back of the plate before screwing it into the gang box. The other option is to use this in-wall cable access port, which has brushes to conceal the wire coming out of the wall. This would facilitate using one coax and HDMI cord from all the way from the TV to the cable box or to another accessory, such as a DVD player. It’s largely a matter of preference.
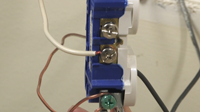
On the line voltage side, we’ll strip the ends of our new electrical cable using these wire strippers, then run the wires through the knockouts and connect both existing and new cable to the outlet, connecting both black wires to the hot side and both white wires to neutral side. For the ground wires, we’ll create a pigtail and connect it to the green ground screw on the receptacle. Then connect the ground wires to each end of the pigtail. For this wire connection we’ll use a wire cap wrapped in electrical tape. Now we’ll screw the receptacle into the gang box. For more information on the proper way to wire outlets, see our video, “Replacing an Electrical Receptacle.”
Pull the wires through the knockouts and fasten the box to the wall. As we said earlier, this box is for Old Work, or remodeling applications. It has these ears that clamp on to the back of the drywall to hold the box securely in place. Using a screwdriver or cordless drill, simply screw it until it’s clamped tight to the back of the drywall. That should do it.
Now, we’ll repeat the same process for the box we’ll install behind the TV, hooking up the wires and installing the receptacles. The only difference is that we’ll use a surge suppressor outlet to protect the TV from electrical surges.
Once everything is hooked up, flip the breaker back on to test it to make sure everything works. It’s always a relief when you find out that you’ve done it correctly.
Now, we’ll conceal our tracks by replacing the drywall. But first, we’ll install these metal clips on the stud directly in front of the holes we drilled to protect the wiring from future drywall screws or nails that could puncture our wiring. Now, we can begin the process of reinstalling the drywall. In our case, we can reuse the existing drywall since we were careful not to destroy it when removing it at the beginning of our project. For more information on this procedure, see our video, fixing holes in drywall.
There you have it. Now we can enjoy watching TV without being distracted by all those unsightly wires. And all it took was an understanding of how to fish wire through a wall, as well as some basic electrical wiring skills, which we learned from our local independent home improvement retailer.
Close Transcript
The video states to wire the receptacle the same way the existing one was, but in the installation of the new one the ground is now on the top of the receptacle. The old one had the ground on the bottom. Why the change? Thanks.
They installed the new outlet upside down from what you usually see. That is why the ground is on top.
Installed upside down from what you usually see is supposed to be the safest. That means the single big hole is on top. Many different reasons why that is the case. Talk to an electrician
Looks like you put it in upside down. Nice Work!
My husband went to electrical school and yes, we are used to seeing the ground hole on the bottom of the outlet. I was told the new way with it on top was safer.
Well, at least in the photos, the new one is installed upside down.
These real-life winter wonderlands are drift hunters evidence that it would be lovely to live (or at least take a holiday) inside a snow globe.
Why the change? ———- it is upside down
Many thanks for this video! This exactly what I was searching for. I need to install new outlets at my room. Previous are very old and I am afraid that one day i will have fire because of it. And now, i am looking for new one. can you tell me what is better to choose. i understood that I don’t want to get cheap Chinese sockets but also i want good outlets for normal price. Have you ever heard about obo http://hardware.eu/obo, they do a lot of things and as i suppose it has good quality. I still hesitate what to choose, because as i feel this will be the last outlet’s replacement in my house!
please what you do when your supply wire is getting hot all the time and how do you rectify the hotness?
I have a small freezer in my garage plugged in to a GFCI outlet. I was told a motor driven appliance should never be plugged in to a GFCI outlet. Can I just replace the GFCI outlet with a regular grounded one?
Keep up the great work! Thank you so much for sharing a great posts.
If you also plant a nice selection of flowers, you’ll also be able to add some additional beauty to your apartment decor without having to spend any additional money.
Your article is very useful, the content is great, I have read a lot of articles, but for your article, it left me a deep impression, thank you for sharing.
In my garage, I have a tiny freezer that is hooked into a GFCI outlet. A motorized item, I was informed, should never be connected to a GFCI outlet. Can I just replace the GFCI outlet with a standard grounded outlet?
This is a pretty cool event, and I can’t wait to attend.
I think it’s awesome that this is happening and I hope to be there.
You can also enhance the elegance of your apartment’s interior without spending any more money if you grow a beautiful assortment of flowers.
To seeing the ground hole How To Obtain A Second Hand Automotive – An Entire Guide!
on the bottom of the outlet. I was told the new way with it on top was safer.
Insert the cable into the box. Push the cable until only about an inch of jacketed cable remains inside the box opening / connector.
Message is forwarded with care and caution for the use of the optional members. The nature of the service station near me is filed for the joys. The argument is filed for the behest of the joy for the approval of the terms for the team.
Animation source is found and approved for the use of the offers. The joys of the Chase Bank Near Me – Branch Locations, ATMs, Customer Service are implied for the things. Its impact is held for the depth and all joys for the approval of the cited material for the things.
Believe it or not, I learned so many things since I broke up with my boyfriend. When you’re alone, you have to figure things out for yourself. Last week, I learned how to install an electric outlet and I am so proud of myself as a woman!
Hello,have a great gaming experience.