How to Replace a Flush Valve
If water from your toilet tank is leaking into the bowl, the first suspect generally is the flush valve. In this video, we’ll show you how to remove the tank from the bowl to replace a flush valve and stop the leak. If you need to replace your entire toilet, you may be interested in our How to Replace a Toilet video.
- Replacement Flush Valve
- Channel-Locking Pliers
- Adjustable Wrench
- Replacement Flapper
- Sponge
- Towels
- Bucket
- Penetrating Oil
- Large Slotted Screwdriver
- Plumber's Wrench

Remove lid from tank.

Shut off water by turning the shut-off valve clockwise.
Drain as much water out of tank as possible by holding flush lever down until toilet is completely flushed.

Sponge or towel out any remaining water in the tank. A shop vac also works well.

Disconnect water supply tube or hose to tank.

Disconnect flapper chain from tank lever arm.

Disconnect refill tube attached to top of overflow pipe.

Underneath tank, unscrew bolts that hold tank to bowl. You may need to spray them with some penetrating oil first before trying to loosen them.

Reach in tank with a long slotted screwdriver to keep tank bolt from turning while loosening nuts under tank with an adjustable wrench. Remove tank bolts.

Lift tank off of bowl and set aside on towel.

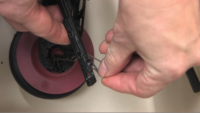
Underneath the tank, unscrew the locknut holding flush valve to the tank using a plumber’s wrench. Remove old flush valve.

Install new flush valve the same way you removed the old one, following manufacturer’s instructions.

Once installed, reattach tank to bowl with tank bolts.
Reattach flapper chain to flush lever arm.
Reattach fill tube to new overflow pipe.
Reconnect water supply to tank.
Turn on water, test new flush valve and check for leaks.
Read Video Transcript
If your toilet is leaking, the first suspect generally is the flush valve. Now if you’re not sure what the problem is, you might want to watch our video “Diagnosing a Leaky Toilet” to figure out which component inside the tank is leaking. Otherwise, stick around and I’ll show you how to install a new flush valve on your toilet.
The good news is that repairing a toilet is easy. It won’t cost you much or take up much of your time. As always, you’ll find all the parts and tools you need to finish this project, along with answers to your plumbing questions, right here at your local independent home improvement retailer.
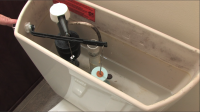
The flush valve is in the middle of the toilet. When you push the lever, the flapper mechanism raises to let water out of the tank and into the bowl.
Some leaks can be fixed by simply replacing the flapper. If that’s all you think you need to fix the leak, check out the FAQs section of our website for more information.
Here, I’m going to show you how to replace the entire flush valve. That will include both the flapper as well as the seat that helps create the seal to keep water in the tank. To install it, you’ll need to remove the toilet tank from the bowl. Don’t worry this is easier than it sounds. So let’s get started.
First, take the lid off the tank.
Then shut off the water to the toilet by turning the shutoff valve clockwise.
Drain the water out of the tank by holding down the tank lever. Use a sponge or a towel to remove the water that doesn’t drain out. Now, disconnect the water supply to the tank. You may need an adjustable wrench or a pair of channel locking pliers to loosen the connection.
Disconnect the chain attached to the flapper. Also disconnect the refill tube that’s attached to the top of the overflow pipe.
Now, we’re ready for the most difficult part of the project: disconnecting the tank from the bowl. Underneath the tank, you’ll see bolts that go through the tank and bowl flange. Unscrew these, and be careful. If they are difficult to remove, use penetrating oil to loosen them. If you try to force them, you could break the tank. To keep the bolt from moving while you loosen the nut, use a large screwdriver to hold the top of the bolt inside the tank.
Once the bolts are removed, lift the tank away from the bowl and place it on a towel on the floor so you don’t scratch it. Tanks can be heavy, so you may need help with this step.
You’ll see there is a large rubber gasket between the tank and bowl. Remove this gasket and save it. Some kits come with a replacement gasket and some don’t. So keep it just in case. They can also be purchased separately.
Unscrew the large lock nut holding the flush valve to the tank. Again, be careful how much force you use, as you don’t want to break the tank. Use a plumber’s wrench or a large pair of locking pliers with adjustable jaws.
After you’ve removed the old flush valve, attach the new one pretty much the same way the old one came off. The rubber gasket goes on the inside of the tank to prevent it from leaking. The lock nut fits on the outside. Hand tighten the lock nut, then five it an extra ½ turn with the plumbers wrench. Don’t over-tighten or you may risk cracking the tank.
Use new brass tank bolts to attach the tank to the bowl. Hand-tighten the nuts evenly and remember not to over-tighten them or you risk cracking the tank.
Connect the flapper chain to the tank lever, leaving some slack for when the flapper is closed. Then, reconnect the water supply tube to the overflow pipe, turn on the water, and your toilet should work like new.
If you have questions about this or any other home improvement project, be sure to read our list of Frequently Asked Questions for this video. And be sure to print out our Project Instructions, which includes a Tools and Materials checklist, before visiting your local independent home improvement retailer. That’s where you’ll find all the products and helpful advice to complete your project. If you’re not sure where to find your local store, check out our Store Locator.
Good luck with your project and thanks for watching.
Close Transcript
Who knew that changing a flush valve could be so easy?
I followed step by step, and it works perfectly. Thanks for patience to explain everything mate!
I had to use the knowledge I learned from this video this morning as I ended up having to completely replace the flush valve and fill valve on my toilet. Only took me about 30 minutes to do both, and most of that time was just in dealing with stuck fasteners and other connections.
I finally had the chance to test my skills when my mom’s toilet stopped working. While the steps to replacing a fill and flush valve are simple in theory, it took me three days to fully accomplish this task.
One of the bolts was so rusted over and the lock nut screwed on so tightly, I needed my sister to hold down the bolt with a screw driver while I used both hands to unscrew the lock nut.
Once everything was installed, water kept leaking through the gasket. I discovered from my handyman uncle that you have to screw down the toilet to a certain PSI (pounds per square inch), which most manufacturer instruction fail to tell the customer. They probably assume that only plumbers will buy their products. He screwed it to the correct tightness (I was too afraid of breaking the porcelain) and it stopped leaking.
Also, I came away with some valuable wisdom for my next DIY project: make sure you have ALL the tools for the project BEFORE you begin. Having to find/purchase tools while your toilet is currently “out of service” is a real pain!
When you said you had to “screw down the toilet” what part or parts are you referring to?
He was most likely talking about the ones that hold the base of the toilet to the floor. You only have to work with those if your toilet wiggles when your sitting on it, or if replacing the whole thing.
No he is talking about the two screws that hold the tank to the bowl. If not tight enough, water leaks from the black rubbery washer between them.
You are completely right. Thanks for sharing that information. water leaked through bolts in my case too. Thanks to your post
[…] to call a plumber because your old toilet is not flushing or filling properly, he’d most likely rip out the old float ball assembly and install a new style float cup assembly. That would save him time, you money, and make life easier for both of […]
I replaced the flush valve but now water leaks from the underside of the tank when I flush the toilet. I followed the instructions and snugged down the big lock nut so I’m not sure where to go from here.
Gerald,
Is your toilet a Gerber toilet? If so, you will need an extra thick tank to bowl gasket. The red gasket Fluidmaster provides is a standard size that fits most toilets, but it will not fit most Gerber toilets. My recommendation is to get a Plumbpak’s tank to bowl gasket for Gerber toilets. It is sold at Lowe’s.
There is a very crucial step missing from this video. These overflow pipes must be cut to the appropriate size. You want to cut the overflow pipes down so that it is 1″ lower than the bottom of the tank lever hole. This will prevent water from coming out the lever hole and flooding your house if ever the fill valve does not shut-off properly. Once your overflow pipe is cut to the right level. Make sure your fill valve is adjusted to the correct height so that it’s C.L. (Critical Level) mark is set 1″ higher then the overflow pipe. These are plumbing code requirements that are often overlooked by the DIYer.
Please never use a wrench or pliers on a plastic water supply connector nut as shown in step 16 above. This is a flood waiting to happen. These nuts should always be hand-tightened. If it leaks after hand-tightening it, replace it. A new supply line will seal just fine being hand tightened. A wrench leads to over-tightening. Over-tightening will result in a broken nut. not right away but months down the road you will come home and find a flooded house. The Fluidmaster instructions clearly say, DO NOT use a wrench to tighten the nut.
I found this video helpful, but I would like to warn any unsuspecting handy-people that if the tank bolts are old they may be difficult to get off. Mine wouldn’t come off with just a little WD-40 and elbow grease. I had to hacksaw them. This had to be done with just a blade with a handle, not a regular hacksaw, because they have to be cut between the tank and the bowl/base. To make matters worse, my toilet is in a very close spot which made accessing the bolts to hacksaw them even more difficult. Once I got the bolts hacksawed the rest of the operation went smoothly.
[…] How to Replace a Flush Valve | PlanItDIY – If your toilet is leaking, the first suspect generally is the flush valve. Now if you’re not sure what the problem is, you might want to watch our video … […]
Thank you for the instructional video. I was installing a new toilet and did not have a tank to toilet seal among the parts and water gushed out when I flushed. Fortunately I was manually flushing with my hand pulling up the flapper so I didn’t dump the whole tank. Several months passed by between the time the tank was installed and I had water so I don’t know if it struck me odd there wasn’t a tank to toilet seal or not but when I took it apart I sure thought there should be something there which led me to the internet and your video. This is a Kohler tank and I don’t know what seal is best but that thick Plumbpak seal you mentioned sounds like it would be better considering the triangle patter of bolts is very close together unlike the tank in your video.
Thanks again.
[…] This article is brought to you by our friends at PlanItDIY.com […]
Remove the tank to do the simple flush valve replacement?
Not necessary
Please show or write up something(replacing flush mechanism without removing tank) for us who don’t know. Thanks.
[…] to call a plumber because your old toilet is not flushing or filling properly, he’d most likely rip out the old float ball assembly and install a new style float cup assembly. That would save him time, you money, and make life easier for both of […]
Thanks for this info – both the instructions and comments.
In my case the inlet valve assembly is separate to the flush unit so I only had to replace the inlet valve assembly. Being an idiot I bought the wrong thing With a long arm and float. The arm and float were too long to fit on my cistern. Instead I get a smaller one like the old one, with a float that slides up and down beside the vertical valve assembly – bottom supply.
It turns out that the seal in this can be replaced so it would probably have been a 5 minute job if I had known that and could find a matching seal. Learned this when reading fitting instruction with the new part.
I replaced the flush valve as shown above yet water leaks from the tank into the toilet, kicks on the fill valve, and runs constantly. I check for obstructions around the flapper and that it is seated correctly. Any suggestions?
She needs to do the video totally nude. This way we could check out what’s going on there. Plus the video might have a chance of going viral.
I checked out my flush valve with a easy tricks found from another articles. It was really great to take tips from professionals for any toilet damage issue. Now I need to replace the toilet flapper and I am here for the tips. Thanks for the video as well..
Hello,
Thank you for the video on changing the flush valve. However, when I got to the step where I cut the water off from the water supply it is still running slowly into the tank. What should I do about this?
Even though I didn’t have to replace the overflow value it only took me 10 minutes to replace the flush system who would have thought I would be the one to fix our toilet problem thanks for the step by step instructors guide.
When you read the rest of these posts, look at the problems people report. They almost all relate to taking off the tank or putting it back on. You don’t have to do this. You can replace a flush valve without ever taking off the tank. Whoever recommended doing it this way must be a plumber looking for work.