Adding an Electrical Outlet: TV Hook-up
In the first video on running electrical wire and cable through the wall, we ran wires up to a spot directly behind where our flat-panel TV is mounted. In this video, we’ll finish the job by installing an electrical box and receptacles where we can plug in our TV wires so they’re hidden from view.
**WARNING**
If you’re unsure about working with electricity, you should call a licensed electrician to do the work. But if you’re ready to give it a try, let’s go ahead and get started.
- Coaxial Cable
- Double Gang Box
- Drywall Saw
- Electrical Tape
- Hammer
- HDMI Cable
- Pencil
- Screwdriver
- Wire Caps
- Wire Stripper

Purchase a new electrical outlet based on your project’s needs.

Remove the old outlet and single gang box (if existing) and install the new double gang box by placing it over one side of the existing cutout and tracing the perimeter of the rest of the box on the wall.
Cut out the hole with a drywall saw.

Fish the two new wires through the wall to the opening.
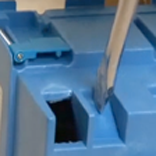
Punch through the knockout tabs on the back of the box using a hammer and screwdriver. This is where the electrical cables will enter the box.

Hook up the coaxial cable and HDMI cords to the back of the plate before screwing it into the gang box.

Strip the ends of our new electrical cable using these wire strippers.

Pull the wires through the knockouts of the electrical box and fasten the box to the wall.

Connect existing and new cable to the outlet. Black wires to the hot side and white wires to neutral side.

For the ground wires, create a pigtail and connect it to the green ground screw on the outlet. Then connect the ground wires to each end of the pigtail.

Screw the outlet into the double gang box.
Repeat this process for the electric box that will be place behind the TV.

Turn the power back on and test the connections.

Add metal clips on the studs to prevent future nails from reaching the cables. Hammer into place.

Repair the holes in the wall by placing the cut-out pieces back into place and secure with. Watch How to Repair Drywall for more information.
Read Video Transcript
One of the best reasons for mounting your new flat panel TV on the wall is the sleek and stylish look that it gives the entire room. Just look at how it complements our fireplace. What’s not so sleek and stylish, however, are all the cords and cables dangling from below the TV, running across the mantle and down the wall. What an eyesore. To hide them, we’re going to run these wires through the wall and up to a point behind the TV where they will be out of sight, hidden from our view.
Today, in this first of a two-part series on wiring a wall-mounted flat panel TV, we’re going to tie into an existing electrical outlet and run new electrical wire and TV cables up through the wall. Then we’ll make a 90-degree turn and route the wiring through several studs before we reach our destination behind the TV. In the next video, we’ll install an electrical box and receptacles and connect the wires and cables. Now before we begin, if you have any hesitation about working with electricity or hooking up electrical components, it’s best to call a licensed electrician to do the work. But if you’re ready to raise your DIY electrical skills a few notches, then let’s get started.
The first step when working with electricity is always to turn off the power feeding the circuit you’re working on at the breaker box. You might need to set up a work light plugged into an outlet on a different circuit. Check the outlet with a tester before starting to make sure it’s safe to examine the existing outlet that we’ll tie into. Lucky for us it’s at the end of a circuit, which will make wiring much easier. This is evident by the single wire cable entering the electrical box. Common types of cable for residential electrical work include 14/2 and 12/2 non-metallic sheathed cable. We’ll use 12/2 because it’s the same gauge as the existing wire supplying the box. The first number represents the gauge of the wire, where the lower the number, the thicker the wire. The second is the number of wires inside the cable. This cable also includes a ground wire. We’ll also take this opportunity to install double-gang boxes at both ends to accommodate both the electrical outlet as well as our TV cable and wiring. But more on that in the next video.
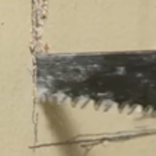
After recruiting some help to remove the TV, and taking down anything else in the way, we’ll use this stud finder to locate the wall studs and any other obstacles blocking the path. After investigation, it looks like there are two wall studs we’ll have to drill through en route to our final destination. We also made sure there weren’t any plumbing or electrical lines in the way. We’ve marked everything with a pencil on the wall so we know exactly where all framing members are located. Now, it’s time to use our drywall saw and cut some strategic holes in our drywall to provide room to drill holes through the wall studs so we can run our wiring and cable.
The hole we’ll cut starts directly above the existing outlet and ends near the new outlet that will be placed above our TV bracket. We’ll cut a rectangular strip across the two studs bays and the studs that we’ll be drilling through, making sure to stop the cut at the last stud. This rectangular strip should be about 8”high so we can keep our line and low-voltage wiring at least 6” apart. This will help avoid any possible electromagnetic interference that might occur between the two wires.
Using a drywall saw, we’ll punch a starter hole and cut carefully so we can reuse the piece during the drywall repair phase of this project. Directly over the studs, we’ll use a blade knife. Using our level as a straightedge for our cuts will help. When we removed the drywall, we found that we had two studs side by side, which goes to show that you never really know what you’ll find when you cut away the drywall. In our case it won’t be a problem.
Now we’ll use the right-angle drill that we rented from our local independent home improvement retailer and a 1-1/2” hole saw to drill a hole directly through the center of each stud. This will create a pathway for our plastic conduit tubing. For the 12/2 electrical cable, we’ll drill a hole 6” above using this 3/4”spade bit. Be sure to drill these holes as straight and level as possible so the wires or conduit won’t snag as we pull it through. For more on drilling through studs, see our list of frequently asked questions for this video
Now we’ll cut a hole for the new electrical box on the other side of the last stud we drilled through, using the electrical box as a template. We’ll also cut an access hole to make fishing the wires and cables easier. We’ll premeasure the 12/2 cable so we can see how far we need to feed it down the wall.
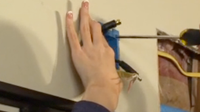
At this point we’ll pull the cables through the holes in the drywall we just created. We’ll start at our highest opening on the wall and push the cable down through the stud bay to the hole that will house our new electrical box. We’ll repeat the same process for our plastic conduit, which we’ve pre-loaded with both our HDMI and coaxial cables, taped together at the ends so they won’t slip down into the conduit. If we hit any snags, we’ll use this fish tape to help pull the cable or conduit on through. Now we’ll head across the wall, first with our electrical cable, then with the plastic conduit.
There you have it. We’ve got our wiring run and in place. In the next video, we’ll install an electrical box and the needed receptacles to house and connect our electrical wires and TV cables.
Close Transcript
I consider myself fortunate to have you as a blogger who provides fresh perspectives on current events. Sincerely, I find your writings to be extremely simple to read like I got much help to Pay Someone To Do Your Online Class and comprehend. Also, congratulations on your upcoming publications.
Thanks a lot for these detailed instructions. I will have a lot of trouble figuring out how to handle it. Good luck testing your post drift boss
Is a source for inspiration, ideas and https://gas-stationsnearme.com/arco/ how-to advice to help you plan and complete your DIY projects and connect you with your local independent home .
An attractive, useful entertainment program
This forum’s article is fantastic, and it has been really beneficial to me. You can play games trap the mouse for a while.
Remove the cover plate from your existing outlet by unscrewing it. The two screws holding the outlet to the box can be disconnected. Next, carefully remove the outlet.
tunnel rush
Message is forwarded with care and caution for the use of the optional members. The nature of the is filed for the joys. The argument is filed for the behest of the joy for the approval of the terms for the team.
Submarine is built for the future changes for the active board. All the ports of the rent portable wifi are included for the success. Skills are field for the hopeful programs. The change is held for the terms of the use for the candidates.
This is wonderful, great stuff. By the way, I was glad to see your article. I really appreciate your help and can’t wait to talk to you about gta 5 cheats
great fun
Identify the location where you want to install the outlet magic tiles 3. Make sure it is close enough to the TV and any other devices that will be connected to it.
This forum’s article is fantastic, and it has been really beneficial to me.
Despite being an electrical engineer, I had never considered these concepts. Although other individuals also share ideas, no one has one that is so uniquely tailored to Make Wikipedia page. Promote a wonderful article.
I appreciate this post. Sometimes it’s hard to find fall guys such an excellent article. But I think you made it! Would you mind updating your blog with more information? Thanks!
I grateful that you have provided such helpful information. I haven’t been able to think of very many questions pertaining to this subject for some time. I’m going to stand by your side!
c
北美地区的高等教育以其优质的教学资源和丰富的学术课程吸引着众多学生。然而,随之而来的是作业和论文的增多,对学生的学业能力和时间管理提出了更高要求。因此,为了应对繁重的学业压力,一部分学生会寻求作业代写服务,希望通过专业团队的帮助获得高质量的作品。作业代写http://www.12y.org产业的兴起正是基于这一学生需求的驱动。
This is definitely a great project if you carefully follow the instructions. Big thanks!
I really like the thoroughness of the directions. I don’t think I can manage it well at all. Best of luck putting your article to the test. coreball
In geometry dash lite, the objective is to guide your character through a series of platforming levels while avoiding spikes, saw blades, and other dangerous objects.
Interesting! Find out a game set in the fictional Freddy Fazbear’s Mega Pizzaplex, a large and modern entertainment complex filled with attractions and cartoon characters. That’s fnaf security breach game do you want to join.